Using Azure Hybrid Connections to connect to SQL On-Prem Database from Azure WebJob.
Tip #1078: Illustrated tipster guide to the decision making process
The binary choices seem to rule the Dynamics 365 landscape as of late. Everyone has an opinion, everyone seems to know the right way to do things, everyone stands by their choices until their last Dynamics breath.
To stop very mature “did not – did to!” arguments when designing, building, and operating Dynamics 365 solutions, we present the ultimate, the one and only, the illustrated tipster guide to the decision making process:

Judicious application of spießrutenlaufen is encouraged, as usual.
MB2-718 Certification: (Microsoft Dynamics 365 Customer Service) – Field Service, Setup & Configuration (Part One)
How to Use Email Analytics in CRM to Drive Sales
 Email marketing can be very telling for marketers and salespersons alike when it comes to understanding the customer and their buying process.
Whether you are tracking bounce rates, conversions, forwards, or responses to ads, there is a lot of information to be collected when you use email marketing tools to track results.
As a salesperson, you may wonder – what’s the proper way to use email marketing campaign data from your marketing automation or email marketing tool to drive sales? How many people actually click on your emails or use them to learn about your products/services, and where do I start?
Let the experts at Ledgeview Partners help you out by answering some of these basic questions …
Convince & Convert, a group of strategic advisors that work with world-class organizations to make digital marketing and customer experiences remarkable, reports that people who buy products marketed through email spend 138% more than people that do not receive emails.
Yes, you read that right!
Now imagine being able to properly reach out to, and use the data in your CRM collected from successful email marketing campaigns, to close sales.
It’s entirely possible and is done more effectively with a properly implemented CRM system, integrated marketing automation, and effective sales processes.
Not only do the results of email-marketing campaigns show what services and products customers are interested in, but how engaged they are with your brand.
Data in CRM collected from email-marketing campaigns will show you the customer’s history of interaction with email campaigns. As a salesperson, some bells should be going off.
You can use this data to help you identify where the customer, or soon-to-be customer, is in the conversion process. You will have more insight into their interaction history, which will help you determine whether they are ready to hear your sales pitch.
 For example, if you are a paper distributor and notice a potential customer, let’s call her Mary, has been clicking on links within your email about switching over to you, you, as the salesperson should start to send follow-ups.
Introduce yourself to Mary. Tell her all the facts about the easiness of switching over to you as a paper provider, how much she’ll save, what better quality you offer and get your results – make that appointment with Mary.
Initiate conversation with compelling user data such as this to establish a professional dialogue and close the sale.
Do you want more information on using customer analytics to empower your sales team?
Get the full Ledgeview eBook FREE here.
How to Bulk Update CRM Records Using the Bulk Workflow Execution Tool

That’s right – no more being limited to mass updating only 250 records at once in Dynamics 365! The Bulk Workflow Execution is a great tool which allows users to run an On-Demand Workflow against a set of records pulled from a System or Personal View, all in bulk! You can find the “Bulk Workflow Execution” tool in the Plug-in Store using the XRMToolBox application.
Let’s look at a quick example of how the tool works. Say that you need to change the Owner of 10,000+ Case records. Follow the steps below:
1. Create an On-demand Workflow.

2. Create a Personal View or use an existing System View to pull your data set.

3. Open XRMToolBox.
4. Scroll and click the Bulk Workflow Execution.
5. Click Yes to connect to your Dynamics 365 organization.

6. Type your Organization URL.

7. Type your Username/Password and click Connect.

8. Type a Name for your organization after it successfully connects. NOTE: once the organization connection is established, XRMToolBox will open a new tab with the tool name and organization name you provided.
9. Select the On-Demand Workflow you created from the dropdown and wait for the tool to retrieve the applicable Views.

10. From the View list, select the System View or Personal View you are running the On-Demand Workflow against. Note: you should see the FetchXML Query populated in the area to the right after you select the View from the list.
11. Click Validate Query to verify the amount of records being pulled in the data set.

12. Determine your Batch Size and Interval Delay.
Note: if unsure, keep the default Batch Size at “200” and Interval Delay at “0” seconds
13. When ready, click Start Workflows.

14. The tool will run and will inform you of progress.

15. When finished, the tool will display a small window indicating the time it completed, how many records the workflow ran against, and number of errors as a result of the execution.

A good rule of thumb is allowing about 2 seconds per record for the tool to update a record. That would be 30 records per minute and 1,800 records per hour. Remember that this tool is completely automated! So, while the job runs you can leave your computer unattended or have it running in the background if multitasking.
That’s it! For more Tips & Tricks and other educational materials on Dynamics 365, check out our blog.
Happy Dynamics 365’ing!
Are you ready for GDPR? It’s coming.
As you’ve probably heard, on May 25, 2018, a European privacy law, the General Data Protection Regulation (GDPR), is due to take effect. The GDPR imposes new rules on companies, government agencies, non-profits, and other organizations that offer goods and services to people in the European Union (EU), or that collect and analyze data tied to EU residents. The GDPR applies no matter where you are located.
WHAT DOES IT MEAN FOR YOUR COMPANY?
There are a few things that GDPR will change:
- Personal privacy rights: Individuals will have the right to access their personal data, correct errors in their personal data, erase their personal data, object to the processing of their personal data, or export their personal data.
- Added controls and notifications: Organizations will be required to protect personal data using appropriate security measures, notify authorities of personal data breaches, obtain appropriate consents for processing data, and keep records detailing data processing.
- Transparent policies: Organizations must provide clear notice of data collection, outline processing purposes and use cases, and define data retention and deletion policies.
- IT and training requirements: Organizations will need to train privacy personnel and employees, audit and update data policies, employ a Data Protection Officer (if required), and create and manage compliant vendor contracts.
In short, GDPR demands stricter controls on where personal data is stored and how it is used. The bring better data governance tools for improved transparency, recordkeeping, and reporting. Finally, it will improve data policies to give data subjects greater control and to ensure lawful processing.
WHAT CAN YOU DO TO PREPARE?
Preparing for the GDPR is a business-wide challenge that will take time, tools, processes, and expertise. Preparations may require significant changes to how you conduct your business and to customers' privacy and data management practices. The requirements are complicated and each organization’s path to readiness will be unique, so don’t wait until May to begin preparing.
We’re here to help. Our team of data and technical experts can assess your readiness and help you determine the best path forward to ensure you can continue to serve your customers.
Contact BroadPoint today for more information and to assess your readiness.
The post Are you ready for GDPR? It’s coming. appeared first on CRM Software Blog | Dynamics 365.
Dynamics 365 Record Hierarchy
Dynamics 365 (CRM) has a neat feature, Record Hierarchy, that can be easily overlooked, but can provide great visual insight into your customers. In this post, we will explore the components that make up this feature.
What Is Record Hierarchy?
The Record Hierarchy in Dynamics 365 is actually a simple concept. It boils down to parent/child relationships. For example, "Fictional Company" is the headquarters which has multiple branch offices, or companies that it owns, in different locations.
Account Records Hierarchy
Parent Accounts within Dynamics 365 (CRM) have been around for a while. However, with the Hierarchy options available, you can visualize the relationships between accounts. So, let's explore this set-up.
Below, you will see a list of Accounts with the Hierarchy Icon at the left of the Account Name.
Due to the Parent Account field being populated on the Account record the hierarchy icon is displayed. For example, on the "Alpine Ski House" account, the Parent Account is "Fabrikam, Inc.".
Now, by simply clicking on the Hierarchy Icon, you can see the hierarchy of the accounts and how they are connected.
As you can see, "Fabrikam, Inc" is sitting at the top level with the companies that it owns sitting underneath. Next, by clicking on one of the sub-companies, the hierarchy view will expand further.
TIP: To open a record from the Hierarchy View, simply click the icon in the top-right corner of the record tile.
User Records Hierarchy
In addition to Account Records, User Records can be visualized with hierarchy. So, let's review how this works.
Below is a list of User Records with the Hierarchy Icon next to the names. Since managers have been set for the users, the hierarchy icon will be displayed.
How this icon is displayed is based on the Manager being added to the User Record.
You can add a manager to a user by clicking the "Change Manager" button at the top of the User Record.
Therefore, when the icon next to "Dan Jump" is clicked, you can visually see the hierarchy.
Next, you can click on a tile below "Dan Jump" to see who reports to this person.
Hierarchy Settings
The Hierarchy visualizations and connections are achieved through the Hierarchy Settings on the entities. You can check the current Hierarchy Settings of an existing entity, or add a new Hierarchy, from the solutions area.
First, you will need to navigate to Settings>Customizations>Customize the System, or Settings>Solutions and select the appropriate solution file.
Next, expand the appropriate entity and select "Hierarchy Settings".
Next, double-click on the "Account Hierarchy" listed and you will see how this is set up.
As you can see in the "Hierarchical Relationship" field, this setting is based on the "Parent Account" relationship. So, let's look at where this is found.
First, you will need to navigate to the One-to-Many (1:N) Relationships under the Account entity.
Next, double-click on the relationship listing, and you will see how this is set up.
Hierarchy in Advanced Finds
The last area we will cover is Advanced Finds. Once hierarchies have been set up with all the appropriate entities, you can utilize Advanced Finds to find data. In the below examples, we will look at Accounts and Opportunities.
First, navigate the "Active Accounts" View in Dynamics 365. Then, click on the "Advanced Find" icon to open the "Advanced Find" window. Next, select "Accounts", "Under", and then in the last field select the Parent Account which is "Fabrikam, Inc.".
Now, the results returned will be Active Accounts that are under the Parent Account of "Fabrikam, Inc.".
By the way, these results can be checked by viewing the Hierarchy Visualizations area.
The next area we will look at is Opportunities under a specific Account. So, you will need to open the Advanced Find window again. But, if you already have it open, just change the "Look for" field to "Opportunities".
In the query area, select "Status equals Active", and "Account under Fabrikam, Inc.". Due to these query settings, the results will show all Active Opportunities under the Parent Account of "Fabrikam, Inc.".
Next, click on the "Results" button to view the results. Now, you should see all the opportunities under the child accounts under the parent "Fabrikam, Inc" account.
In Conclusion
The Hierarchy options can help you visualize or find important customer data within Dynamics 365. Because many people consume data in different ways, having a visual method to see the data is a great "tool" to have at your fingertips. So, the next step is for you to try these things in your system!
Aaron Back is Microsoft Certified Professional with many years experience with Microsoft Dynamics 365 (CRM). He is actively involved with the Microsoft Dynamics CRMUG (User Group) Community. His involvement includes: Serving as Chapter Leader for his local CRMUG Chapter, serving on the CRMUG Board of Advisors, and speaking at the annual CRMUG Summit conference.
ACE Microtechnology, Inc. is a professional services firm committed to delivering Dynamics 365 (CRM) business solutions to small and medium sized organizations. Our focus is on delivering products and services that improve our clients’ business operations. ACE has developed specialties in serving the lite manufacturing, distribution and the hospitality industry.
Rather than just building technology or implementing software, we deliver real business value through industry knowledge and understanding each client’s business. We make it our business to know your business.
For more information or assistance with Dynamics 365 (CRM) contact ACE!
The post Dynamics 365 Record Hierarchy appeared first on CRM Software Blog | Dynamics 365.
Part 5: Data Integration – Best Practices Strike Back
Tip #1079: Security Design Principles
 We have a lot of flexibility when it comes to security in Dynamics 365; field-level, record-level, hierarchy, ad hoc sharing and so on. Sometimes, depending on the requirements, there are a few ways to skin the cat (such a violent expression). Whenever you are presented with a range of options to solve a problem, it is good to fall back on some guiding principles to work out the right path. Here is my MASCOT model for security design.
Maintainability: If the design cannot be maintained by a power user/non-coding developer, rethink. Having a base security role helps in this regard
Always Think of the User: If the Users hate it, the system will not be used. There is a balance to be found between governance and practicality
Simplicity: Keep the design as simple as possible. Minimise Security Roles and Business Unit complexity. Documentation gets lost and exception rules are often forgotten. Do not share security roles between Users and Teams though
Configuration First: Mixing development and security can lead to scalability issues, especially if automated sharing and un-sharing is involved. Keep the system running smoothly by avoiding ad hoc sharing of records via code
Only Use Security When Necessary: If there is not a valid business reason to protect information, don’t. A lack of trust is not a valid business reason
True Security, Not Security By Obfuscation: It is sometimes much easier to remove a field from all forms and views and think it is secure. If the data can be found via Advanced Find, it is not secure
I remember one security model which broke all of these rules. Accounts came in from a third party system via integration. Based on the Account’s office location, code automatically allocated it to a Territory and then ad hoc shared the Account to all Users with permission to access that Territory. To keep up with the growing scaling issues and minimise User complaints, the administrator was upgrading the RAM of the SQL Servers literally every month. Field security was implemented by simply adding and taking away fields from forms and having Users use the right form. It was a mess.
I reviewed their system and proposed a security model using both record and field level security and no code. The only difference was one field, previously read only, would be editable. A vastly simpler security model and no more RAM blow out. The CTO refused to change because he was the architect of the original model and, despite having auditing enabled, did not trust his employees not to edit that one field.
Six months later he was sacked, his team replaced, and a rival CRM system implemented (yes, THAT one!). They could have upgraded Dynamics for a fraction of the cost but the system was so despised it was politically easier to ditch it.
Learn from the mistakes of others and embrace the MASCOT.
Entity ownership type: Business Unit
Microsoft Dynamics 365 Workflows: Workflow Steps
Introduction to integrating Azure Functions & Flow with Dynamics 365
Calling Dynamics 365 actions from Logic Apps
I have created a global action. This action is not doing anything meaningful yet, it simply takes an input parameter and appends “Your Input was” to the front of it, and returns it as an output parameter. Here are the screenshots of the action.
The above screenshot displays the Assign step of the action.
Calling the action from Logic Apps
I have used the Logic App I created in my last blog and modified it slightly. I have only made changes to Step 4 of the app.For calling an action:
- Use Post as Method.
- Provide the D365 Web API Uri. The last part of the Uri is the name of the action I am calling. In this case it is new_ActionLogicApp.
- Provide the input parameter of the action in the Body.
{
“Input”: “MyString”
}
Result
I have attached a screenshot of Step 4 after execution.So there we go, we have successfully called a CRM action from the Logic App.
MB2-718 Certification: (Microsoft Dynamics 365 Customer Service) – Field Service, Setup & Configuration (Part Two)
Fixed – Unable to import CSV file due to error The source data is not in the required format in Dynamics 365
How to Bulk Edit in Microsoft Dynamics 365/CRM
Do you need to update a set of records to a new State? Change the billing information for a set of records? Update Contact Preferences for a group of Contacts? Update the status on a group of Opportunities? Save clicks and entry time by using Bulk Edit. Bulk Edit is a tool to help you edit several records at once instead of having to spend the time and energy changing each record individually.
This simple guide will walk you through how to use the Bulk Edit tool in Microsoft Dynamics 365/CRM to make your workflow more efficient.
1. Go to the list/view for the records you need to update
2. Select the records you need to update and click Edit on the command bar
3. A new screen will display where you can make the bulk changes:
4. Enter the data you need to update for the accounts and click change
5. The records are now updated with the new data entered
Get more tips, training, and best practices by attending our monthly user group webinars for Microsoft Dynamics 365 and CRM Users and Administrators.
Printing from Dynamics 365 for Finance and Operations

The ability to print transactions and reports is a simple but critical aspect of user experience and productivity. Regardless of industry vertical, a common business expectation is to have a hosted ERP application configured in the Cloud.
As transactions are being performed, they need to be reported, shared, and printed between stakeholders and decision makers. Users trying to print documents on network devices from hosted applications often face challenges such as print drivers that might incompatible or not available on their device. In some cases, the user’s device might not be connected or able to connect to the corporate network due to infrastructure constraints.
In Microsoft Dynamics 365 for Finance and Operations, you can seamlessly print documents from a local or network-connected printer device as long as it provides integrated services supporting an HTML5 client and uses hosted client applications with Microsoft Office 365 services. This makes it easy to generate, store, and distribute documents. You can print documents and export reports directly from the client as PDF files or Microsoft Office documents. In this blog, we’ll explain how printers are installed and configured to print documents.
Dynamics 365 for Finance and Operations offers a downloadable embedded application, known as Document Routing Agent (DRA) that you can use to enable network printing scenarios. DRA manages the spooling of the documents and can access both local and network printers that are connected to the computer running the Dynamics 365 for Finance and Operations application in the Cloud.
Here are a few pre-requisites for configuring the Document Routing Agent:
- The Microsoft Azure Active Directory (Azure AD) account that is used to configure the Document Routing Agent must share the same domain as the Azure tenant.
- The application requires Adobe Acrobat Viewer.
- The DRA is supported only on Windows 8.1 and Windows 10, or on Microsoft Windows Server 2012 R2.
- Access to network printing resources requires Active Directory Domain Services (ADDS) authentication.
These steps need to be followed to install and configure DRA:
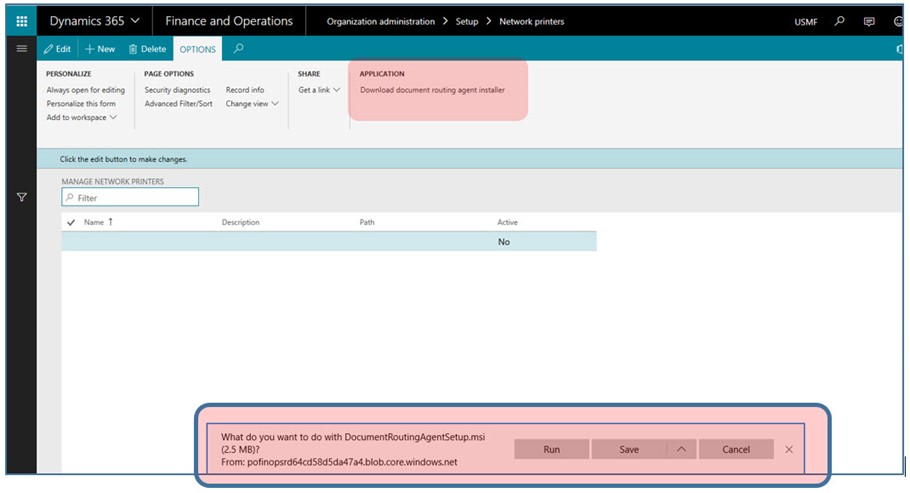
1. Open the Manage network printers page (Organization administration > Setup > Network printers).
2. On the Options tab, in the Application group, click Download document routing agent installer. Run the downloaded file to begin the installation process.
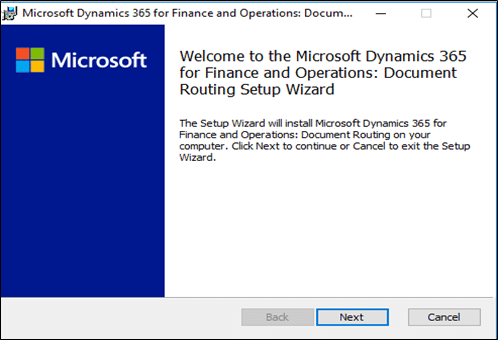
3. Complete the setup process.

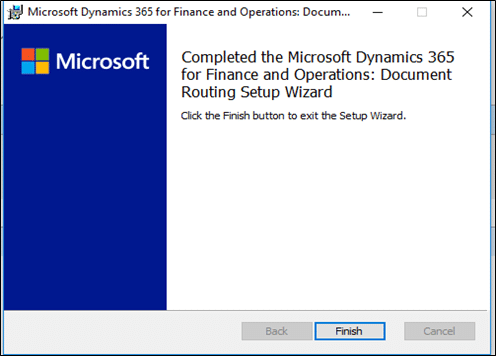
After the application is installed, you can begin to register local printers as network printers for the Finance and Operations applications.
4. Close all browser instances that are running the Finance and Operations application. This resets the local Azure authentication tokens.
5. On your desktop, run the Document Routing Agent. On the toolbar, click Settings.

6. Update following parameters:
- Application ID – The ID that is unique to the application and should be entered automatically.
- Finance and Operations URL – The base URL of the Finance and Operations application.
- Azure AD tenant – The domain name of the Azure AD.
7. Click OK.

8. Click Sign in to sign in to your account. Once successfully signed in, the Printers button becomes available on the toolbar.
9. On the toolbar, click Printers.
10. Select the printers to make available in the Finance and Operations applications.

11. Specify a default name for the printer.
12. Click OK. The selected printer devices will be registered in the Finance and Operations application.
To complete the print job, the registered network printer needs to be marked Active and it can be done by following the below steps:
- Open the Manage network printers page (Organization administration > Setup > Network printers).
- Edit the existing entries that are mapped to each network printer. As part of your changes, edit the connection path.
- To include a printer as an option in the Print Destinations field, set the Active field to Yes.
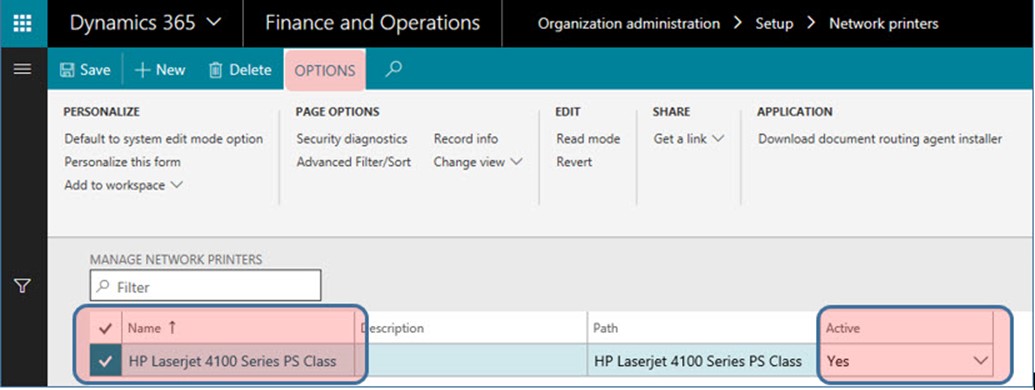
- Click Save.
Now you are all set to print from Dynamics 365 for Finance and Operations! Check out our blog for more guides to Dynamics 365 for Finance and Operations.
Happy Dynamics 365’ing!
Wi-Fi Network not showing up in Windows 10
5 Tips to Ensure a High User Adoption Rate when implementing your New Microsoft Dynamics 365 Solution – User Training
In our previous article, we offered some tips to improve user adoption rate even prior to the implementation of a new CRM solution. That said, proper training tailored to the specific needs of end users is essential to ensure a high user adoption rate for a new CRM solution such as Microsoft Dynamics 365. The users of the solution need to become familiar with its features and processes before they can leverage its benefits to increase their productivity. No matter how much money your organization invests into a new system, if the training fails to address users’ specific realities, they will simply revert to their old habits.
The next 5 tips will help you tailor your user training to ensure that this doesn’t happen and that users obtain a full understanding of the system and how it will simplify their daily tasks.
- Give all users an overview of the system. Even if each team only uses part of the system, it’s important that all users get a feel for the entire system and navigate through it. Knowing how the entire system works will help them learn the processes relevant to their specific responsibilities and how they relate to other departments.
- Show users how the new solution can facilitate their daily tasks. If possible, introduce them to personalized dashboards and views, as well as advanced searches, so that they are aware of how the system can be tailored to meet their specific needs and facilitate the experience. Use customization options to reduce the time spent navigating between entities or records.
- Split training into small teams. This way, the training can be tailored to the users’ specific needs, roles and tasks, ensuring that the information is relevant. Moreover, users will be more likely to ask questions and pay attention if they are a part of small group.
- Prioritize tasks and set clear goals for the utilization of the CRM. Having clear objectives and tasks to master before moving on to the next will help users focus on what has to be learned. It also makes it easier to assess whether they fully understand how processes work, making it easier to define and adjust the rest of the training.
- Have your super-users give the training. At this point, user questions are usually more about the process and less about features. The super-users of the solution are in the best position to guide end-users through the process and ensure that they have fully internalized it prior to using the solution for their day-to-day activities.
By getting the proper training, your end-users will be able to leverage the functionalities and potential of the new solution to carry out their daily tasks and activities and improve their productivity. Should you find yourself in need of advanced or tailored training sessions, please communicate with JOVACO for more information about our CRM and Microsoft Dynamics 365 training sessions.
By JOVACO Solutions, Microsoft Dynamics 365 specialist in Quebec
The post 5 Tips to Ensure a High User Adoption Rate when implementing your New Microsoft Dynamics 365 Solution – User Training appeared first on CRM Software Blog | Dynamics 365.
Miss Focus in 2018? That'd be silly!
Blog written by Laurie Gramer, D365UG/CRMUG Program Manager, Dynamic Communities.
It's time to Focus on you.
A week from tomorrow is the early bird deadline to register for Focus 2018. If you have been to Focus, you know what an incredible learning and networking opportunity it is, and I'll see you in Indianapolis, IN on May 23-24.
If you haven't been yet, well, missing it would just be plain silly. Why?
9. It's race week in Indy! (We may even have a race car at the event)
8. This conference is unlike any other, with four role-based tracks and exclusively deep-dive sessions. Learn more: https://www.ugfocus.com/schedule/schedule-crmug
7. Focus is much smaller than D365UG/CRMUG Summit, providing an intimate event yielding quality time with your peers and subject matter experts.
6. It's work and home friendly - two-day of fabulous content and networking!
5. You can also participate in a variety of Dynamics 365/AX sessions for free (D365UG/AXUG sessions are happening down the hall).
4. All sessions are intermediate- to advanced-level content. Your brain will hurt.
3. Some true rock stars of our community will lead sessions - MVPs, D365UG|CRMUG All-Stars, and user and partner subject matter experts (stay tuned for more exciting announcements).
2. Our sessions - Focus concentrates on four very specific learning tracks. Attend advanced, deep-dive sessions in one track or jump between tracks for a truly customized conference experience.
1. Working with Dynamic 365/CRM is an exciting place to be right now, let's get together to learn and grow.
I look forward to seeing you in Indy!
Regards,
Laurie Gramer,
Laurie.Gramer@DynamicCommunities.com
Blog originally posted at: https://www.crmug.com/blogs/laurie-gramer/2018/02/20/miss-d365ugcrmug-focus-18-thatd-be-silly


