Quantcast
Channel: Microsoft Dynamics 365 Community
Viewing all 13977 articles
Browse latest View live

Bruce Biron, Joins ACE Microtechnology, Inc. as Microsoft Dynamics CRM Practice Lead

$
0
0

brucebiron

Bruce Biron, joins ACE Microtechnology, Inc. as Microsoft Dynamics CRM Practice Lead

ATLANTA, GA, August 2015 - ACE Microtechnology (ACE) a global business and technology services firm that provides Microsoft Dynamics Solutions - Microsoft CRM and Microsoft Dynamics GP (formerly Great Plains), has welcomed a new team member, Bruce Biron. Bruce brings over 15 years of direct CRM implementation experience to the practice. During this time he has acted in various implementation project team roles including Managing Consultant, Pre-Sales Specialist, Sr. Project Manager, Sr. Business Analyst, System Architect, System Configurator, Data Migration Specialist and Trainer. He has completed over 200 + projects of various sizes, budgets, implementation durations and complexities throughout many types of industries including manufacturing, homebuilding, land development, aviation, retail, software development and not-for-profit. His project sizes ranged from 20 to 3,000 user, with budgets of $50K - $1.5M lasting from 1 to 18 months in duration.

Bruce is an excellent communicator and facilitator able to lead Requirements and Design Workshops with clients to working with a coordinated project team to ensure specific tasks are being completed on-time and within budget according to defined Project and Work Plans.

Bruce is able to adapt quickly to unique client needs and changing project variables. This includes adapting to various implementation methodologies / strategies, client documentation expectations as well as changing project scopes. He is creative with his design architectures and able to keep the project team focused on successful implementations.

Bruce graduated the University of Texas at Arlington with a B.S in Accounting and has devoted his entire professional career to CRM.

For more information or assistance with Microsoft Dynamics CRM contact ACE!

by ACE Microtechnology

The post Bruce Biron, Joins ACE Microtechnology, Inc. as Microsoft Dynamics CRM Practice Lead appeared first on CRM Software Blog.


Why You Should Integrate Your Financial System to Microsoft Dynamics CRM: From a Controller’s Perspective

$
0
0

A controller’s primary tool is an ERP system since all of the financial information is stored there, but that does not mean that they are not invested or interested in the details from other departments across the organization.

The finance department is typically solicited to pull financial data because other groups may not have access to this information and they require these details to analyze their operations or client activities. By integrating your Microsoft Dynamics CRM and ERP systems, other key members within the organization can pull their own reports to analyze their data in real time whenever they need it and without relying on the finance team to create these reports for them. Reports that are typically requested by other departments to the finance group are the following:

  • Sales & Marketing: Customer sales and margins
  • Sales & Marketing: History on customer payment patterns and current outstanding balances
  • Operations: Key performance metrics regarding products and backlogs
  • Human Resources: Employee salary details and other benefits

By integrating your financial system to Microsoft Dynamics CRM, it makes it easier to share this information with other departments so that everyone is reviewing and analyzing the same data.

There is also information that is generated within the organization’s customer relationship management (CRM) tool that may be important for the finance team to be aware of. This information can include:

  • Sales pipeline: Having access to this information at all times can help the finance department build budgets and forecasts for the upcoming periods more efficiently.
  • Support plans and calls: If there are any issues that arise at the time of billing or collections, the finance team can start by reviewing the customer’s history so that they will know who to address internally as well at the customer site.
  • Order entries: Even if this information can be found within the ERP system, integrating the order entries from the CRM application can help decrease the amount of work required by the order-entry team and reduce the number of potential errors when re-entering data.

What is important to remember is that you don’t have to limit yourself to only storing customer information within a CRM. By integrating your CRM to your financial system, this opens the door to use this application as a platform to gather all of your various peripheral custom applications and databases into one environment. This creates a single portal for your users to access information, which allows you to reduce the number of potential integrations and potential errors.

An example where your finance team can more easily share information with another department is with the human resources group. This information affects your finance team in regards to payroll and other benefits, but there is a lot of additional information that is required by the HR department that can be centralized within a CRM application. This will make it easier to maintain and alleviate the requirement to purchase ERP licenses for the entire HR team and will also allow them to have a greater flexibility for storing pertinent data in regards to all employees.

By having an integration between your financial system and your CRM, even members of your organization who may not be customer-facing can benefit from such a tool since information can more easily flow between your different departments allowing, for a greater visibility and understanding of key operations across your entire organization.

Read our other blogs in this series to learn more about why your organization should integrate their financial system to Dynamics CRM, and have a look at our infographic on “Why Companies Should Take Advantage of an Integration Between Their ERP and CRM Systems”.

By JOVACO Solutions, a specialist in Microsoft Dynamics CRM integrations in Quebec

The post Why You Should Integrate Your Financial System to Microsoft Dynamics CRM: From a Controller’s Perspective appeared first on CRM Software Blog.

Microsoft Dynamics CRM Browser Compatibility

$
0
0

Microsoft Dynamics CRM (MSCRM) is a web-based application which means that the entire program runs in a web browser. As I am sure you are aware, there are many web browsers out there and each browser has many versions. Below is a breakdown of browsers and Windows versions which are compatible with Microsoft Dynamics CRM. Keep in mind that browsers change often and not all features work all the time with each browser. The browsers listed below have been tested with Dynamics CRM and Microsoft is committed to keeping compatibility over time.

  • Windows Vista, Windows 7, Windows 8 and Windows 8.1 are all officially supported.
  • Windows XP is not supported regardless of the browser you use.
  • Internet Explorer version 8, 9, 10 and 11 are all officially supported. IE 7 is not supported.
  • The latest version of Firefox is supported on Windows Vista, Windows 7, Windows 8 and Windows 8.1.
  • The latest version of Chrome is supported on Windows Vista, Windows 7, Windows 8, Windows 8.1 and Google Next 10 tablet.
  • Apple Safari is only supported on a MAC computer or iPad. Only OS X 10.8 and 10.9 are supported. Safari is only supported in MSCRM 2013 or 2015. It is not supported in MSCRM 2011.
  • As of July 2015, Windows 10 and the new Microsoft Edge browser have not been tested for compatibility. Watch for future updates.

For more information about Microsoft Dynamics CRM 2015 system requirements, this link provides a great resource: https://technet.microsoft.com/en-us/library/hh699831.aspx. Contact TopLine Results at info@toplineresults.com for more information.

by TopLine Results

The post Microsoft Dynamics CRM Browser Compatibility appeared first on CRM Software Blog.

From the Microsoft Dynamics CRM Blogs: Alternate Keys; Debugging Tablet App; Record-Level Restrictions; Decompile DLLs

$
0
0

A selection of the latest insight from the Dynamics CRM blogs:

  • Utilizing Alternate Keys in Dynamics CRM Integrations
  • Dynamics CRM App for Tablet Issue on Instances Upgraded from CRM 2011
  • Dealing with record level access restriction with Dynamics CRM
  • CRM 2015 - How to Decompile a Plugin Assembly (DLL)

Utilizing Alternate Keys in Dynamics CRM Integrations

On the PowerObjects blog, JoeCRM talked about one of the challenges of integrating external data with Microsoft Dynamics CRM. The problem is that when you update a record via the API, you have to know the GUID (global...

read more

[Tips] Ventajas del CRM 2015

$
0
0
Hace unas semanas un cliente que tiene el CRM 2011, me pregunto cuáles serían las ventajas de migrar al MSCRM …

Creating a Codeless Opportunity Payment Schedule in CRM

$
0
0

This blog is a republishing of the original I did for the Microsoft Dynamics CRM Team Blog which you can find here.

The new calculated fields provide a lot of opportunity for codeless configuration in Dynamics CRM. In this example I will walk through creating an automated payment schedule in CRM for an Opportunity using calculated fields and Dialogs.

Business Case

For larger sales, we sometimes stagger payments over a period of time. Perhaps this is a lease-purchase arrangement or maybe a lay-by payment system. While, in theory, aspects such as interest, deposits and final lump payments could also be incorporated, I will leave these as an exercise for the reader.

The Key Entities

For this example, I will work with two entities: Opportunities and a custom child entity called Payments. In terms of the fields I am using we have:

  • Opportunity
    • Days Between Payments (Integer, How many days between each payment)
    • Payments Start Date (Date, When payments start)
    • Total Payments (Integer, The number of payments)
    • Estimated Revenue (Currency, The out of the box field to represent the total amount being paid back)
  • Payment
    • Amount Remaining (Currency Calculated, After this payment, how much remains to be paid)
    • Days Between Payments (Same as the field of the same name on the Opportunity)
    • Due On (Date Calculated, When the payment is to be made)
    • Payment Amount (Currency Calculated, How much the payment is for)
    • Payment Number (Integer, The nth payment)
    • Payments Start Date (Same as the field of the same name on the Opportunity)
    • Total Amount (Same as the Estimated Revenue field on the Opportunity)
    • Total Payments (Same as the field of the same name on the Opportunity)

In an ideal world, I would not repeat the fields on both the Opportunity and the Payment record, keeping them on the Opportunity record. However, it is not possible to refer to parent fields in a calculated field so it is necessary to denormalize and keep the values in both places.

The Calculations

The formulae for the calculated fields are:

Amount Remaining

image

Due On

image

Payment Amount

image

In theory, with the values we set on the Opportunity and the Payment Number, all other numbers can be calculated.

image

Automating with Dialogs

In principle, we could leave the solution there and manually create Payment records from the Opportunity. Assuming we map the fields down from the Opportunity to the Payment entity, all we need do is create a new Payment record from the Opportunity, enter the Payment Number and the system will do the rest. However, for a schedule with 100 payments, this is a lot of work.

This is where Dialogs come to the rescue. With Dialogs we can automate the creation of all Payment records. To do this I will create two Dialogs:

  • Payment Scheduler: This initializes the loop and creates the first payment record
  • Payment Creator: This is a child Dialog that calls itself and creates all the other Payment records

What is interesting about this arrangement is that it appears to circumvent the infinite loop detection which can plague workflows when we try to call them to generate multiple records. I tried creating 100 payments and it while it took a few seconds of processing, it worked fine.

The Payment Scheduler looks like this:

image

Both Dialogs run from the Opportunity entity. In this one we confirm the four key constants, held on the Opportunity (Total Amount, Start Date, Days Between Payments and Total Payments) and write them back to the Opportunity with the Update step.

image

For some reason I could not get the Estimated Revenue to appear for the Prompt and Response default value, even though I could display it as part of the prompt. If this is a problem, you may need to create a separate Total Amount field.

We then create the first Payment.

image

Finally we call our looping Dialog to create the rest of the Payment records, passing it the total number of Payments.

The looping Dialog looks like this:

image

Firstly, it takes in the previous Payment’s number and if the last Payment was the final Payment i.e. Payment Number = 1, the Dialog ends. If this is not the case a new Payment record is created.

image

We then update this record to reduce the Payment Number by one.

image

The next step in our Dialog is a bit of a dirty trick. We want to loop the Dialog but we do not want a Dialog page to appear many times. Every Dialog requires a Page with an associated Prompt and Response so, to meet this criterion, we embed it in an If-Statement which will never succeed (in my case the associated Opportunity name must be blank, which will never be the case).

Once past this, the Dialog calls itself passing through the Payment’s Payment Number.

The Final Result

The end result is a set of Payments against the Opportunity, evenly dividing the Opportunity total across all Payment records. If we want to keep track of when payment are actually made, we could add additional fields like a receipt number field or a simple tick box.

To create the Payment records, the user simply fires up the Dialog from the Opportunity.

image

Then, after making sure the four fields have values, they click Next and the Dialog shows its Finished screen.

image

After clicking Finish, the Opportunity now has a full set of Payments against it.

image

Conclusions

While a simple application of the tools, this shows how combining Dynamics CRM functions like calculated fields and Dialogs can create very powerful and intuitive tools for the user. In the past creating a tool like this for the user required plugins and extensive development with limited capacity for maintenance by the CRM Administrator. With this approach the CRM Administrator gets complete control of the tool and its behavior.

Asynchronous Batch Process Solution Revisited – part 4

$
0
0

In the previous post, I walked through the ABP (Asynchronous Batch Process) Aggregative Query Scenario. In this post, last in this series, I’ll go through the External Action scenario.

Prerequisites

1. Download the Asynchronous Batch Process Solution, import into Microsoft Dynamics CRM 2015 on-premise/Online organization
2. Go to Settings – > Solutions and Open the ABP solution. Go to the Batch Process entity definition and check the Settings checkbox in the ‘Areas that display this entity’ section
3. Save and publish the solution

As always, I advise against publishing any external solution on your production environment without testing it first.

External Action scenario

This scenario describes a scheduled action, not necessarily related to Microsoft Dynamics CRM records, hence external.
The target records FetchXML query can be used but it is optional.
This action is usually a wrapper for Custom Workflow Activity performing some magic which the native process tools can not.

Some sample business requirements of this type:

– Retrieve users data from AD (Active Directory) on daily basis and update Microsoft Dynamics CRM users data accordingly
– Import/export data to/from Microsoft Dynamics CRM to an external application over night
– Generate and email SSRS report to a mailing list every month

Following are the steps to implement the daily AD users data synchronization. For this scenario I assume you already registered a Custom Workflow Activity with some capability to retrieve data from AD and update System User records.

1. Create a new Action targeting ‘None (global)’ and name it ‘Synchronize AD users’
2. Add a step to activate the AD synchronization Custom Workflow Activity component
3. Save and activate the process

image

4. Create a new Batch Process record (Settings –> Batch Processes)
5. Name the Batch Process: ‘Daily AD users synchronization’ (or other meaningful name)
6. Set the Activation Frequency to ‘Daily’
7. Set the Process field value to ‘Synchronize AD users’ process
8. Set the Next Activation to any future date and time. I suggest selecting the application’s least busy time
9. Set the Status Reason to ‘Scheduled’
10. Click Save to schedule the Batch Process

image

You are done! The Batch Process is set and waiting for the next activation date and time. If all goes well, the AD users
synchronization will execute as defined and the Batch Process will reschedule to the same time next day.

If you would like to deactivate the Batch Process scheduling, change the Status Reason value to ‘Suspended’ and save. Since there may already be a Workflow instance scheduled and waiting, go to the Background Processes for the Batch Process record and cancel waiting instances.
This also applies if you change the Next Activation date/time once the Batch Process record is already created and scheduled.

I hope you find the scenarios I have described in the series as useful to you. If you have development skills or resources, you can customize the ABAP solution as you like, the source code is available on CodePlex.
I will keep adding features to this component and upgrade along with Microsoft Dynamics CRM versions until MS supplies a similar built in solution.

Tip #464: Connecting PowerBI to CRM Online

$
0
0

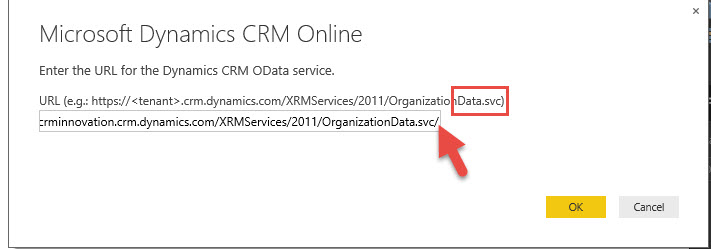
Don’t be a literal as me and make this same mistake when setting up a connection to CRM Online for PowerBI. Read the fine print!

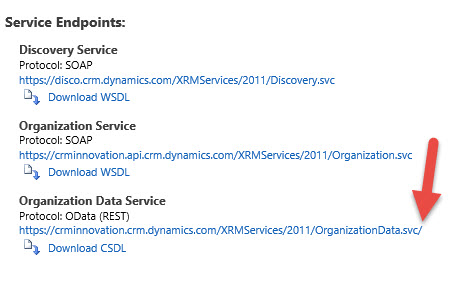
See how in the example there is no trailing space to include in the oData service endpoint!

oData Service Endpoint

oData Service Endpoint

You will get an error when you copy and paste the URL from the developer resources window from CRM. PowerBI doesn’t like the trailing space at all. It will say it can’t find the endpoint. Remove the slash before or after pasting it in and clicking on OK.

CRM Developer Resources

CRM Developer Resources


Sharing Customer/Vendor Information across multiple legal entities by using Global Address Book AX 2012

$
0
0

Global Address Book allows Customer/Vendor information mainly addresses and contact details to share across multiple legal entities.

For example: Customer/Vendor of one legal entity may be Customer/Vendor in other legal entity or Customer in one legal entity may be vendor in same legal entity etc.

In below scenarios explain on how we can share Customers, Vendors and their addresses and contact details across multiple legal entities.

Scenario 1Utcon Engineers Pvt. Ltd is Customer as well as Vendor in USMF Legal entity
Scenario 2Toyo Engineering Pvt. Ltd is Customer in USMF legal entity and also customer in USSI legal entity
Scenario 3Globus Engineering  is Vendor in USMF legal entity and also Vendor in USSI legal entity

Scenario 1:

Utcon Engineers Pvt. Ltd is Customer as well as Vendor in USMF Legal entity

  1. Select USMF legal entity.

1

  • Click Home > Common > Global Address Book

2

  • In Global address book form, in new field click on Party to create new party

3

(Party: A person or organization. A party can be internal or external to an organization. Party may be customer or vendor for organization)

  • In party ID for, specify Record type Organization, in name field enter organization name Utcon engineers Pvt. Ltd. Specify addresses and contact details of Party and close the form.

Close the form

4
 
5

  • Now you can see created Party record on Global address form.

6

  • Now edit Party record (Utcon engineers Pvt. Ltd.) and in Party tab, click on customer to create customer in USMF legal entity.

In Customer form, you can see name, address and contact information automatically came from Party record.

Enter other information which is required for customer and close the form.

7

  • You can see created Customer in Accounts receivable or in Sales and marketing module.

Navigation: Accounts receivable/Sales and marketing > Common > Customers > All            customers

8

  • Now go back to Global address book form edit party record (Utcon engineers Pvt. Ltd.) and in Party tab, click on Vendor to create vendor in USMF legal entity.

    In Vendor form, you can see name, addresses and contact information automatically came from Party record.

    Enter other information which is required for vendor and close the form.

9

  • You can see created vendor in Accounts payable or in Procurement and sourcing module.

Navigation: Accounts payable/Procurement and sourcing > Common > Vendors > All            vendors

10
 

Scenario 2:

Toyo Engineering Pvt. Ltd is Customer in USMF legal entity and also customer in USSI legal entity

  1. Select USMF legal entity.
  2. Click Home > Common > Global Address Book
  3. In Global address book form, in new field click on Party to create new party
  4. In Party ID form, specify Record type Organization, in name field enter organization name Toyo Engineering Pvt. Ltd. Specify addresses and contact details of Party and close the form.

    Close the form

11

12

  • Now you can see created party record on Global address form.

13

  • Now edit Party record (Toyo Engineering Pvt. Ltd.) and in Party tab, click on Customer to create Customer in USMF legal entity.

    In Customer form, you can see name, addresses and contact information automatically came from Party record.

    Enter other information which is required for customer and close the form.

14

  • You can see created Customer in Accounts receivable or in Sales and marketing module for USMF legal entity.

    Navigation: Accounts receivable/Sales and marketing > Common > Customers > All            Customers

15

  • Now select USSI legal entity.
  • Click Home > Common > Global Address Book
  • Select Party (Toyo Engineering Pvt. Ltd.) and click on edit. Click on customer to create customer in USSI legal entity.
    In Customer form, you can see name, address and contact information automatically came from party id record.

    Enter other information which is required for customer and close the form.

16

  • You can see created customer in Accounts receivable or in Sales and marketing module for USSI legal entity.
    Navigation: Accounts receivable/Sales and marketing > Common > Customers > All            customers

17


Scenario 3:

Globus Engineering Pvt. Ltd is Vendor in USMF legal entity and also vendor in USSI legal entity

  1. Select USMF legal entity.
  2. Click Home > Common > Global Address Book
  3. In Global address book form, in new field click on Party to create new party
  4. In party ID form, specify Record type (Organization or Person), in name field enter organization name Globus Engineering Pvt. Ltd. Specify addresses and contact details of Party and close the form.

18

19

  • Now you can see created party record on Global address form.

20

  • Now edit Party record (Globus Engineering Pvt. Ltd.) and in Party tab, click on Vendor to create Vendor in USMF legal entity.
    In Vendor form, you can see name, address and contact information automatically came from Party record.

Enter other information which is required for Vendor and close the form.

21

  • You can see created vendor in Accounts payable or in Procurement and sourcing module for USMF legal entity.
    Navigation: Accounts payable/Procurement and sourcing > Common > Vendors > All            Vendors

22

  • Now select USSI legal entity.
  • Click Home > Common > Global Address Book
  • Select Party (Globus Engineering Pvt. Ltd.) and click on edit. Click on Vendor to create Vendor in USSI legal entity.
    In Vendor form, you can see name, addresses and contact information automatically came from Party record.

Enter other information which is required for Vendor and close the form.

23

  • You can see created Vendor in Accounts payable or in Procurement and sourcing module for USSI legal entity.
    Navigation: Accounts payable/Procurement and sourcing > Common > Vendors > All            Vendors.

24


Relationship of Party with Customer and Vendor

You can check relation between customers or vendors between different legal entities on Party form.

  1. In Global Address Book, select party and click on edit and open Relationship fast tab to check relationship between customers or vendors between different legal entities

25


Summary:

By using Global Address Book you can create a business party, define various information like addresses, contact details etc. and by using Party you can create and share customers and vendors across multiple legal entities.
 

The post Sharing Customer/Vendor Information across multiple legal entities by using Global Address Book AX 2012 appeared first on CloudFronts - Dynamics CRM | AX | BI.

Overcoming Multi-Level Rollup Field Limitation

$
0
0

Currently I’m working on a project that has some scenarios that need to do rollup calculation in 3 or more level of relationship hierarchy. For a sample and imaginary case, I have an entity called Project that has one or more Project Milestones and each Project Milestones has one or more Invoices (Project 1 – N Project Milestone, Project Milestone 1 – N Invoice). And I would like to see the total paid invoice value at the project level so that the project manager could have a quick overview on the project budget vs invoice that has been paid. To achieve this, the first thing that come up in mind would be the new Rollup Field that introduced in Dynamics CRM 2015.

However, there are some limitations of rollup field: “A rollup attribute formula can’t reference another rollup attribute.” and “Rollup attributes can’t be used as a workflow event or wait condition. These attributes don’t raise the event to trigger workflows.” (https://msdn.microsoft.com/en-us/library/dn817863.aspx)

By looking at the limitations it seems we are a bit hopeless to achieve this in “codeless” way using rollup fields, now let’s develop a plugin for this requirement! Wait, there is a “codeless” solution for this, well at least the code has been wrapped and packaged in this Codeplex solution by Demian Raschkovan: https://calculaterollupfield.codeplex.com/.

So, to trick the limitation of rollup field, I need to create a container (simple field) to hold the rollup value and every time there is any change happened to the source that part of the rollup calculation, trigger a workflow to force calculate the field and copy the value to the hidden field.

Below screenshots are the way I achieve this functionality:

Entity and Field Configuration

  • Invoice Entity: A standard currency field

InvoiceEntity

  • Project Milestone Entity: A rollup currency field with a hidden currency field as the container.

ProjectMilestoneEntity

  • Milestone Paid Amount Rollup field Configuration

MilestonePaidRollupFieldConfig

  • Project Entity: A rollup field that referring to the hidden rollup field on project milestone entity and some fields to do the calculation on the remaining budget.

ProjectEntity

  • Project Paid Amount Rollup Configuration:

ProjectPaidAmountFieldConfig

  • Remaining Budget Configuration: A simple calculation from Budget Field subtracted by the Paid Amount

BudgetRemainingConfig

Workflow Configuration

  • Workflow on Create/Update of Invoice Entity: This will keep track the rollup on record creation or update of the rollup field. To achieve a seamless multi-level rollup, the rollup field must be calculated first to be stored in the hidden field by utilising Calculate Rollup Fields Custom Workflow Activity from the codeplex link above.

InvoiceWorkflow

  • Workflow on Create/Update of Project Milestone Entity:

ProjectMilestoneWorkflow

The Result

For the sample, I have a sample data of a project with some project milestones related to it:

ProjectSample

And then on the first milestone (M1), I created an invoice payment detail:

InvoiceCreation

When I refresh the project record, voila, the value is rolled up and calculated :)

Result

Conclusion

With this trick, we could achieve Rollup and Calculation without code. It is a big platform enhancement thank to the CRM Product team that allow us to achieve some basic calculation that previously can only be achieved by using custom code, but now it is simple configurable.

Hope this help!

Creating Content Packs in Power BI

$
0
0

What are content packs?

Content packs let users package up and share your own dashboard, reports, and datasets with your co-workers. It can be useful where a user needs to regularly distribute reports to team instead of sending email request repeatedly.

Content packs are easy to find as they are all in one location, the content gallery. And since they’re part of Power BI, they leverage all the great features of Power BI including interactive data exploration, new visualizations, Q&A, integration with other data sources, data refresh, and more.

Difference Between content packs and sharing dashboard

Content packs are different from dashboard sharing which gives your co-workers read-only access to your dashboard and any associated reports.

Steps for creating content packs

Here we have two Pro Power BI user account. One with name as Kailas where we will be creating content pack and publishing to another Pro Power BI user account Ashish. Ashish can view the content pack and personalize/customize to create his own local copy. Steps for doing the same is as given below:

Step 1:

Log in to your Power BI account and on top right corner click on ‘Create Content Pack’ as shown below

1

Step 2:

Here you can specify email address to share your content pack with either specific members or group. Also select dashboard that needs to be shared via content pack. Automatically it will select related reports and dataset. Click on ‘Publish’

2

3

Step 3:

On another Power BI user account click ‘Get Data’ and under ‘My Organization’ click ‘Get’

4

Step 4:

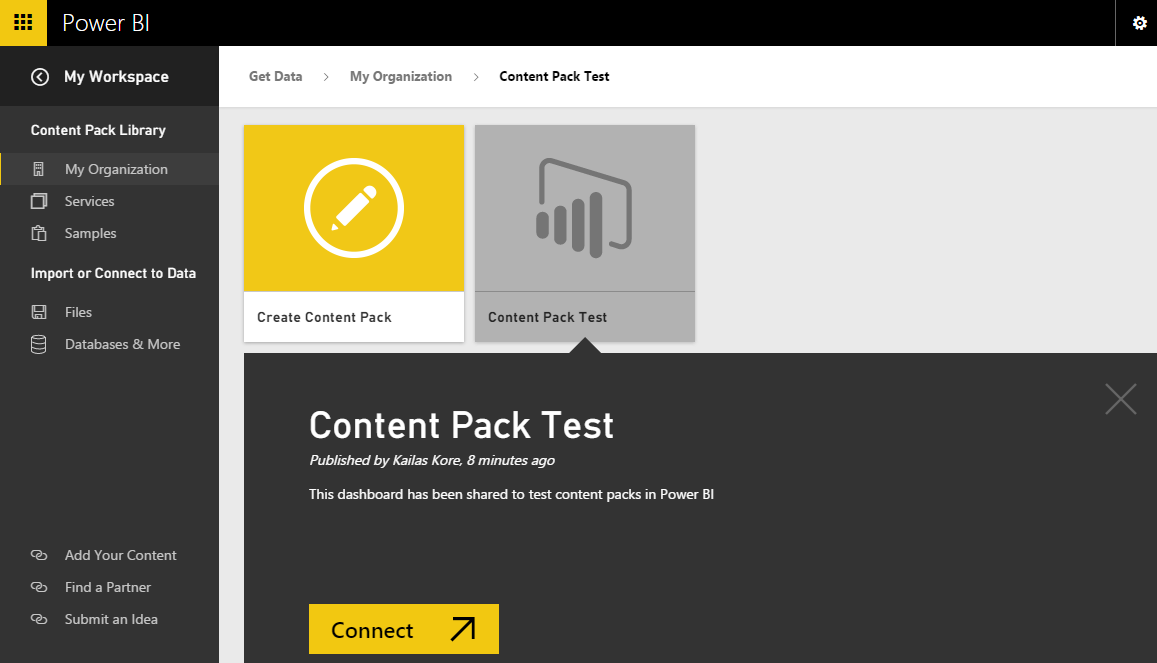
Here you can see the name of the content pack shared. Here in this case it is ‘Content Pack Test’. Later click connect

5

Step 5:

You can see dashboard, reports and dataset shared here with * marked

6

Step 6:

Once you click on dataset, it will prompt you with the below message. Click save and it will personalize to create a local copy so that user can play around and save any work done.

7

8

You can also check content packs created by clicking on ‘View Content Pack’ as shown below

9
 
For more details you can also refer the link given below:

https://support.powerbi.com/knowledgebase/articles/651040-introduction-to-organizational-content-packs
 

The post Creating Content Packs in Power BI appeared first on CloudFronts - Dynamics CRM | AX | BI.

Set Address using Lookup Address for locked Address fields in Dynamics CRM

$
0
0
Recently, we had a request, the request is like this, Bill-To address and Ship-To address on the Quote would be locked fields. This means, one way of setting the Bill-To and Ship-To is by using Lookup...(read more)

Infographic – Six Strategic Advantages of Mobile CRM

$
0
0

If your company has not yet mobilized its sales force, you could be missing out on increased profits and growth. Even if you already have mobility, you still may be missing out if you are not using mobile CRM. Adding mobile access to your customer relations management can help increase sales by 25% or more.

Mobile CRM empowers the sales team by helping them increase sales. How does it do that? Take a look at this infographic for six strategic ways:

CRM_Mobile_Infographic_finalEDITED


Here are three specific ways:

Access to Information

One way is by giving mobile employees access to customer and product information, including current pricing and promotions. This gives customers more options, making it easier for the team to sell add-ons and close sales, and it helps speed customer buying decisions.

Shorter Billing Cycles

Billing delays after delivery of a service can erode profits, but they can be avoided by using mobile CRM. Shortening that billing gap by even 3 days has increased cash flow by almost 10% or more. That’s money that could be working for your company.

Accurate Data Entry

Errors caused by re-keying data are another profit loser that mobile CRM can reduce. If you equip your mobile workforce with tablets, smart phones or laptops (devices that are predicted to increase productivity by as much as 91% in the next 2 years), employees can input their information directly into the company database without having to rekey it later at the office.

According to one source, up to 76% of sales teams meet their sales goals if the company supports their mobile activity, whereas only 53% do so with no support.

So in order to realize these benefits though, your company needs to fully support your mobile teams, giving them the best device and data for their needs. When 89% of business executives directly relate mobility to the success of their companies over the next three years, it’s time to get serious about having a well-equipped mobile task force. You can—with Microsoft Dynamics CRM!

Interested in Microsoft Dynamics CRM for a mobile workforce? Contact AbleBridge.

By AbleBridge, Massachusetts Microsoft Dynamics CRM Partner, www.AbleBridge.com

The post Infographic – Six Strategic Advantages of Mobile CRM appeared first on CRM Software Blog.

{Useful to know}– Moving User’s Business Units in Dynamics CRM? Beware of all the side effects

$
0
0
We had this requirement recently with one of our clients. They had a change in their business processes and from team based security, they wanted to move to region based security. What they wanted from...(read more)

Announcing CRM DevTools for CRM 2015 and Update 1!

$
0
0

Last January we released a brand new tool called CRM DevTools for CRM 2013 and 2011 UR12+.  Today we’re happy to announce a new update that supports CRM 2015 and CRM 2015 Update 1.  If you missed the original release, head here for usage information or here for the latest release.

Along with CRM 2015 and Update 1 support, we added a few more handy features.

Note:  Most of these new features will open a new window so be sure enable pop-ups

Form Tab – Record Properties

The Record Properties button on the Form tab brings back the old Properties page from CRM 2011 that still exists but isn’t surfaced anywhere in the UI.  The page displays the permissions on the record and the Created By, Created On, Last Modified By, and Last Modified On.

image

image

Form Tab – Performance Center

The Performance Center button on the Form tab displays the native Performance Center on top of the record form.  The Performance Center is used to debug any performance issues with a record form to see where it can be optimized.

image

image

Debug Tab

The new Debug tab replaces the old DB & Server tab.  The information from the old tab is now within the Environment Info button.  The Debug tab has 5 buttons to provide easy access to native debug pages within your CRM environment.

image

Debug Tab – Diagnostics Page

The Diagnostics Page button opens the native Diagnostics page for your environment.  This page helps debug any network issues and admins can use it to run a latency and bandwidth test.

image

Debug Tab – Environment Info

The Environment Info button opens the native Debug Information page for the CRM environment.  It contains version information for the CRM server and database, along with other settings. 

image

Debug Tab – Default Solution

The Default Solution button is pretty straight-forward and will open up the default solution for the organization.
 

Debug Tab – CRM For Tablets

The CRM For Tablets button will open up the CRM For Tablets app within your browser.  This is very handy to help debug any JavaScript issues with the app.  The native browser developer tools can be used to see any JavaScript errors that might occur within the app.  It can also be used to just see how the app will look with your organization.

image 

We hope you enjoy the latest release of CRM DevTools as much as we do!  Hit us up in the comments with any feedback or suggestions for future releases.


FAV Plugin for Microsoft Dynamics CRM: Formula, Aggregation and Validation

$
0
0
InfoStrat has developed the FAV Plugin for use with Microsoft Dynamics CRM to support data validation, aggregate operations, and formula support without programming. Many business applications for Dynamics...(read more)

Tip 134 Campos calculados con campos vacíos

$
0
0
Los campos calculados parecen ser el último grito de la moda. Y el tip de hoy viene desde LEGO land, …

Tip #465: Learn how Outlook and Exchange synchronization works

$
0
0

In Tip 435 we mentioned the old CRM 4.0 synchronization whitepaper as an “oldie” but still valuable whitepaper. Great news! This whitepaper has been updated. the all new “how it works” whitepaper. The CRM team has done a great job of documenting the way that synchronization works, including clarification on how deletes are handled, and documentation of new features, such as synchronization field mapping. This is a must have for CRM administrators and people supporting users who synchronize with CRM.

Download the whitepaper here

Microsoft integrará con Dynamics CRM la plataforma de gamificación Fantasy Sales

$
0
0
Mucho se ha hablado en los últimos dos años del software de gamificación, en sus distintas acepciones. Para los que …

Test and Enable Mailboxes in Microsoft Dynamics CRM 2015

$
0
0

One of the main reasons people use Microsoft Dynamics CRM is to track email, appointments, contacts, and tasks in one place so individuals and teams have a complete record of communications with customers.

If your organization uses server-side synchronization to synchronize email, appointments, contacts, and tasks, you’ll need to test and enable your CRM mailbox before you can use it. Or, if you’re an administrator, you can test and enable mailboxes for your users.

In this blog, we’ll tell you everything you need to know about testing and enabling mailboxes.

Why would I need to test and enable a mailbox?

You only need to test andenable a mailbox if you’re using server-side synchronization as your synchronization method. You don’t need to test and enable a mailbox if you’re using CRM for Outlook or the Email Router for synchronization purposes.

Every user in CRM gets a CRM mailbox by default. After your mailbox is set up, to synchronize it with an email server (Exchange or POP3) using server-side synchronization, you have to click the Test & EnableMailbox button to make sure the mailbox is linked and configured correctly.


When you click Test & Enable Mailbox, CRM verifies that the mailbox is configured correctly. For example, CRM verifies that:

  • The mailbox email address is correct.
  • The connection to the email server is working.
  • You have the right privileges to access the mailbox.

If the test is successful, the mailbox is enabled for server-side synchronization.

When you click Test & Enable Mailbox for outgoing emails (the Outgoing Email option on the Email tab of the System Settings dialog box is set to Server-Side Synchronization), a test message will be sent to that email address. You’ll see a message as in the screen shot below.

Note: The test message cannot be disabled and the text cannot be changed.

Who can test and enable mailboxes and where do you do it? 

You can test and enable a mailbox if:

  • You own the mailbox
  • You’re a system administrator and you have access to other users’ mailboxes

To test your own mailbox:

  • Go to Options > Email > View your Mailbox.

To test your users’ mailboxes or several mailboxes at the same time:

  • Go to Settings > Email Configuration > Mailboxes.

In this view, you’ll see all the mailboxes your role allows you to access. You can select multiple mailboxes and test and enable them together.

When do I need to test and enable a mailbox? 

You need to test and enable a mailbox in any of the following situations: 

  • When it’s first set up and you haven’t already tested and enabled it.
  • When you change your mailbox email server profile. An email server profile is a connection to the email server.
  • If the mailbox synchronization method is changed to Server-Side Synchronization from a different synchronization method. 
  • When you activate a mailbox that was inactive.
  • If you change your email address.

Note: If you change your email address, your system administrator will have to approve the new email address before you can test and enable it.

A simple and effective tip to know whether you need to test and enable your mailbox again after changing it is to go to the Active Mailboxes view (go to Options > Email > View your email). If you see Not Run in the Incoming Email Status, Outgoing Email Status, or Appointments, Contacts and Task Status fields, and the synchronization method is set to Server-Side Synchronization, you need to test and enable your mailbox. 

The following screen shot shows an example:

Where do I view the test results?

It’s important to understand that the test and enable action doesn’t take place immediately. If successful, it can take up to 15 minutes to complete. 

First, you can go to the mailbox itself. As displayed in the screen shot below, test and enable results appear on the alert wall of the mailbox.

If you’re the system administrator, you can check the status of the test by going to Settings > Email Configuration > Mailboxes.

Check the Incoming Email, Outgoing Email, and Appointments, Contacts, and Tasks fields. If your test was successful, you’ll see the word Success, as shown in the following screen shot:

What do I see before, during, and after test and enable?

What you see depends on where you are the process.

Before test and enable

After you save your changes to the mailbox, but before you click Test & Enable Mailbox, you’ll see Not Run in the Incoming Email Status, Outgoing Email Status, and Appointments, Contacts, and Tasks Status fields. The date in the Mailbox Test Completed On fieldwill be the previous date of test and enable.

During test and enable

During the test and enable process, the field values won’t change. This can be a little confusing, since there is no indication that the test is actually running.

After test and enable

When test and enable is finished successfully, you’ll see Success in the three status fields (or Not Run if the synchronization method isn’t server-side synchronization), and the Mailbox Test Completed On field will show the current test date.

Troubleshooting

Depending on the load on CRM Server, you should get the test results within 15 minutes. If the test fails, you’ll see Failure in the status field. If the test isn’t complete, you’ll continue to see the previous test and enable results.

The following tables describe issues that can cause the test to fail.

General issues

Email address issues

Email server profile

Additional resources for testing and enabling mailboxes

We hope you found this blog helpful. In our next blog, we’ll discuss email server profiles.

Stay tuned! 

Elad Ben Yousef

Casey Yu

Emad Tawadros

Viewing all 13977 articles
Browse latest View live


Latest Images