Quantcast
Channel: Microsoft Dynamics 365 Community
Viewing all 13977 articles
Browse latest View live

Tip #1049: Download Dynamics 365 documentation

$
0
0

If you have recently searched for documentation for Dynamics 365, you have probably discovered that the documentation is consolidating in https://docs.microsoft.com/en-us/dynamics365/.

So if you click “Enterprise Edition Applications,” you can find the user guide, customization guide, and administrator guide for Sales, Customer Service, Field Service, etc.

But what if you yearn for the old days and want to download a copy of the documentation? The good news is, you still can. From any page on docs.microsoft.com, look at the lower left side of the screen.

This will get you a PDF copy of the entire guide which you are viewing, just like old times.

Cover photo by Chris Lawton on Unsplash


Tip #1050: Drink safely and drive in moderation

$
0
0

Who would have thought that the wild celebration of the 40 measly tips would turn into 4 years of searching, begging, stealing, and borrowing that next tip. I have to admit, on odd occasion the thought of having an intimate relationship with the daily routine did cross my mind but I’m glad that the team has thought otherwise, organized a timely intervention and persevered with this madness.

This year we celebrated tip 1,000 by performing a glorious victory song while dancing naked around a campfire in Nashville but not, to my surprise, tip 1024, which most of us would consider a rounder number to celebrate.

Happy 2018

It’s time to call it a day until the year of the brown earth dog (though Pantone seems to disagree on the annual color selection). In this festive season, beware of small objects in children’s hands and unsafe swimwear. Befriend someone who knows CPR and always remember the first tip. See you in 2018!

Mapping Product Attributes to Quote/Order/Invoice Line Items (Dynamics 365 Customer Engagement)

$
0
0
Working in-depth amidst the Sales entities (e.g. Product , Price List , Quote etc.) within Dynamics CRM/Dynamics 365 Customer Engagement (CRM/D365CE) can produce some unexpected complications. What you...(read more)

Create Email Message with Attachment from a Note

$
0
0

Recently I saw a request of how to create an email message with an attachment that exists from a Note, and how to do this via a Plugin. I remembered doing something like that in an old project, so I thought that I would share the logic behind this.

The first thing is to decide how this will be called. This logic can be called from an Action or Plugin, but the logic will reside in backend code. How to initiate the process is up to you. Once we initiate the process, the first thing to do is to retrieve the notes from the existing entity that contains the note documents. In order to retrieve the notes, we need to implement the following logic:

private EntityCollection RetrieveAnnotations(string entityName, Guid entityId)
        {
            QueryExpression query = new QueryExpression(Annotation.EntityLogicalName)
            {
                ColumnSet = new ColumnSet(true),
                Criteria =
                {
                    Conditions =
                    {new ConditionExpression("objectid", ConditionOperator.Equal, entityId),new ConditionExpression("objecttypecode", ConditionOperator.Equal, entityId)
                    }
                }
            };

            EntityCollection results = service.RetrieveMultiple(query);
            return results;
        }

 This logic will retrieve all of the annotations related to a particular entity record. I did not add another condition for IsDocument, but you can add it if required. I will show that in the end. The next step is to create to more functions. The first function is to create an email message, and the second in to add the attachment to the email message that I created. Let's take a look at each one of these functions separately.

The Create Email Message function receives 4 Parameters: From (Type Entity), To (Type Entity), Subject (Type String) and Email Body (Type String), and returns the Guid of the Email Message that was created. The source is shown below, and can be modified to fit your exact needs:

private Guid CreateEmailMessage(Entity from, Entity to, string subject, string description)
        {
            Guid emailid = Guid.Empty;
            Entity email = new Entity("email");

            EntityCollection fromParty = new EntityCollection() { EntityName = "activityparty" };
            fromParty.Entities.Add(from);
            email.Attributes["from"] = fromParty;

            EntityCollection toParty = new EntityCollection() { EntityName = "activityparty" };
            toParty.Entities.Add(to);
            email.Attributes["to"] = toParty;

            email.Attributes["subject"] = subject;
            email.Attributes["description"] = description;try
            {
                emailid = service.Create(email);
            }catch (FaultException<OrganizationServiceFault> ex)
            {string message = "An error occurred in the CreateEmailMessage function";thrownew InvalidPluginExecutionException(message);
            }return emailid;
        }

Once we create the email message we can add the attachment to the message. The information for creating the attachment is retrieved from the notes, so there is no real changes required. We will see how everything fits together at the end.

private Guid AddAttachmentsToEmail(Guid emailId, string fileName, string documentBody, string mimeType)
        {
            Entity attachment = new Entity("activitymimeattachment");
            attachment["subject"] = "Attachment to Email";
            attachment["filename"] = fileName;
            attachment["mimetype"] = mimeType;
            attachment["body"] = documentBody;

            attachment["objectid"] = new Entity("email", emailId);
            attachment["objecttypecode"] = "email";try
            {
                Guid attachmentId = service.Create(attachment);return attachmentId;
            }catch (FaultException<OrganizationServiceFault> ex)
            {string message = "An error occurred in the AddAttachmentsToEmail function";thrownew InvalidPluginExecutionException(message);
            }
        }

 Now that the Email message is created, and the attachment is added to the email message, we need to just Send the Email Message. The function only needs the email Id of the message, but can be modified as needed:

privatevoid SendEmail(Guid emailId)
        {
            SendEmailRequest request = new SendEmailRequest();
            request.EmailId = emailId;
            request.TrackingToken = "";
            request.IssueSend = true;try
            {
                SendEmailResponse response = (SendEmailResponse)service.Execute(request);
            }catch (FaultException<OrganizationServiceFault> ex)
            {string message = "An error occurred in the SendEmail function.");thrownew InvalidPluginExecutionException(message);
            }
        }

Finally, we can put everything together in the CreateEmailLogic function which will retrieve the notes by calling the RetrieveAnnotations function, loop through the collection of the notes, check if they are a document, create the email message, add attachments and send the email. This is the way the entry point function looks like:

privatevoid CreateEmailLogic(string customEntityName, Guid entityRecordId)
        {
            EntityCollection notes = RetrieveAnnotations(customEntityName, entityRecordId);if (notes.Entities.Count > 0)
            {foreach (Entity note in notes.Entities)
                {bool isDocument = Convert.ToBoolean(note["isdocument"]);if (isDocument)
                    {// Should check these attributes exist in Notestring documentBody = note["documentbody"].ToString();string mimeType = note["mimetype"].ToString();string fileName = note["filename"].ToString();// Need to get information to generate email message
                        Guid emailId = CreateEmailMessage(from, to, subject, emailMessage);
                        AddAttachmentsToEmail(emailId, fileName, documentBody, mimeType);
                        SendEmail(emailId);
                    }
                }
            }
        }

There are many possible variations to  the above logic and functions, but with the above you can accomodate the requirements that you need. 

Running government from the cloud: Tips for implementation teams

$
0
0

Many government agencies are facing the need to replace aging, disparate software solutions that support critical business processes and functions. Often, these aging solutions are siloed and are on internal networks that are not easily accessible outside of the government office complex, which affects employee mobility, data sharing, and access to real-time information. As a result, many state and local government organizations are looking to enterprise-wide, cloud-based platform solutions to support business processes, increase data sharing, and support mobility.

Enterprise-wide cloud applications offer the opportunity to deploy systems that gove...

read more

5 Ideas for Using Personalization in Emails with Dynamics 365

$
0
0

Email marketing is no longer a one-size-fits-all initiative. Consumers now expect customized communications from the organizations they do business with. And when businesses meet those expectations, they reap the benefits. Research from Experian reveals that emails with personalized subject lines are 26 percent more likely to be opened. And according to Aberdeen Group, personalized emails improve click-through rates by 14 percent and conversion rates by 10 percent.

So, what can you personalize in an email? You are really only limited by the information that you have available in Microsoft Dynamics 365. While that’s great news in terms of the flexibility you have for customizing campaigns, it can also be a little daunting to figure out where to start. To help you get started with personalization and take your emails to the next level, here are five ideas for how to use personalization in your emails:

1. Name. Using a lead or contact’s name in an email is likely the most common use of email personalization, and rightly so. It’s a simple and effective way to show your recipients that you know who they are, and it helps create a connection with recipients immediately. You can use names in an email subject line or preheader, as seen here:

Or choose to greet your customers or leads by name in the content of the email:

2. Important dates. Our lives are filled with dates worth remembering and recognizing, both professionally and personally. So, what better way to endear yourself to your customers or prospects than to acknowledge these important dates too? An anniversary as it relates to your organization is a popular pick for a date to recognize. In the example email below, you can see how a professional association incorporated a date to recognize how long an individual had been a member of the association.

Birthdays are another important milestone to recognize. Other important dates to recognize could be the birth of a child or a wedding date. Again, you are really only limited by the data you have available in Dynamics 365.

3. Location. Consider these two subject lines: “Check out these hot new restaurants” versus “Check out these hot new Atlanta restaurants.” If you’re a foodie, you might be inclined to open the email either way, but the subject line that references the city you live in is more attention-grabbing because you know that the content is localized to you and very relevant. Localization also works well in the body of an email, as seen in the example below for a real estate brokerage, which references the city where the recipient wants to buy a new home and displays a few homes available in that location.

4. Dollar amounts. As seen in the example below, nonprofits in particular can use dollar amounts as an effective way to personalize their emails. This personalization allows the organization to recognize a donor’s specific contribution rather than just a general reference to an unspecified donation amount. Other examples of this personalization in action could be retailers with loyalty programs using dollar amount personalization to thank a customer for spending a certain amount or a financial institution could employ this type of personalization to show how much a customer has saved using a round-up on purchases savings account.

5. How you met. Sometimes people need a little reminder of how they met your organization, and they also like seeing that you remember too. This is particularly true for new leads who are having their first few interactions with your business. Did they visit your website? Make a purchase from your store? Attend an event? For example, a college wanted to send an email blast to prospective students that their representatives had spoken with at a series of college fairs. Using personalization, they were able to incorporate the name of the specific event each prospective student attended, providing a more customized email experience.

These are just a few examples of email personalization you can try in your communications. As you gather data in CRM, think of other opportunities for personalization that would suit your business and audience.

This post was contributed by ClickDimensions.

The post 5 Ideas for Using Personalization in Emails with Dynamics 365 appeared first on CRM Software Blog | Dynamics 365.

January plans: Get ready to schedule your Microsoft Dynamics 365 CRM v9 update

$
0
0

Microsoft Dynamics 365 CRM customers should be on the lookout in January for the chance to schedule their version 9.0 cloud updates.

That announcement came recently from the Dynamics 365 team, who advised that they aim to start the scheduling process in January and run the updates to v9 from February 2018 to August 2018. Customers running Dynamics 2016 versions 8.0, 8.1, and 8.2 can upgrade.

As Microsoft explains in its update documentation, customers on 8.0 or 8.1 today will likely face a mandatory update to 9.0 in ...

read more

Why Project Managers are Using Dynamics 365 for Project Service Automation

$
0
0

Most project managers rely on software tools to track and manage the delivery of projects. Typically, the first step after finalizing the project charter is to build your WBS (work breakdown structure). One of the most popular tools for this is Microsoft Project which allows you to build your WBS into a project plan where you can assign dependencies, resources, durations, and dates. While it is a very powerful tool, Dynamics 365 PSA (Project Service Automation) offers a more robust end-end solution that also links the sales team to the delivery team.

Some of the unique benefits of PSA include:

Linkage to Dynamics CRM Opportunities or Quotes:

  • Project quotes and budgets (Fixed Fee and/or Time & Materials)
  • Display project related key indicators to give the sales team more insight around:
    • Meeting customer expectations
    • Meeting the revenue goals of sales

project service automation

project service automation

Features within Dynamics Project Services Automation:

  • Leverage Business Process Flows to standardize the flow and activities of a project
  • Project plan templates can also be used to ensure standardization/consistency
  • Set resource labor rates
    • Since these rates are centralized this offers an automated structure that ensures standardized budgeting capability
  • Set charge categorization (Billable vs. Non-billable)
  • Develop WBS
    • Categorize by phase or sprint
    • Create dependencies
    • Enter roles and resources
    • Include effort and duration
    • Indicate date ranges
  • Manage Gantt charts
  • Cross project resource forecast, utilization, and availability
  • Project and resource reports, dashboards, and charts

project service automation

Linkage with Dynamics Time Entries:

  • Resources can enter time directly against projects maintained in Dynamics which offers accurate and up to date budget details
  • Resource time entries can be entered against specific project tasks which allows for traceability of plan vs. actual effort

project service automation

As you can see from the features listed, this is much more than just a project management tool. It provides all the capabilities to help ensure that the process and controls of your organization’s PMO are standardized and adhered to.

Furthermore, the tool offers the Delivery Management team full reporting and management capabilities across the portfolio of projects. Finally, the most amazing part of this tool is the way it bridges the divide, which many times exists, between the sales team and the delivery team.

For more information about Project Service Automation, check out our CRM Minute video!

Happy Dynamics 365’ing!


Time to Cash Out?

Social selling: Microsoft Relationship Sales brings LinkedIn Sales Navigator to Dynamics 365/CRM

$
0
0

Yes, practically everybody in business knows LinkedIn; but many have not yet delved into LinkedIn Sales Navigator, the company's toolset that builds upon classic LinkedIn for "social selling."

Now that LinkedIn is part of Microsoft, Dynamics 365/CRM partners in particular should be taking note and assessing the value of the social network with their clients. Through the Microsoft Relationship Sales application, LinkedIn Sales Navigator integrates with Dynamics 365/CRM. When used together, Dynamics 365 users may find that LinkedIn becomes a platform to "leapfrog" the first introductory sales call and enter the second. LinkedIn Sales Navigator pro...

read more

Leverage the New Tax Plan to Invest in Your Business

$
0
0


Have you been waiting for the chance to invest in your business, upgrade your tech, and bring your company up-to-date with the latest industry trends? There’s no time like the present!


On Wednesday, December 20, 2017, Congress passed the Tax Cuts and Jobs Act. This tax reform legislation will allow you to dramatically increase your business’s annual deductions. These massive savings can be utilized to upgrade your company’s tech profile.


Are you taxed on pass-through income? If you’re an S corporation, partnership, or sole proprietorship, the new tax bill will allow you to deduct as much as 20% of pass-through income each year.


If your business is organized as a C corporation, you could see a huge decrease in what you owe, too. The current maximum corporate tax rate of 35% is being reduced: the new cap on corporate revenue will be just 21%. That’s a lot of extra money in your company’s accounts come tax time.


On top of this, the new tax law makes it easier to invest significant amounts of money into your business’s infrastructure. Under Section 179 of the bill, certain types of technological investments can be written off all at once, rather than being depreciated over the course of years. This amount is capped at $1,000,000, as opposed to the current cap of $510,000.


You know that keeping up with shifts in the technological landscape is essential to your company’s success. But, you’re also worried about investing too much at once: you’ve got cash flow and short-term revenue to think about. While it’s not unusual to shy away from tech investment, the reality is that doing so can have a significantly negative impact on your business’s long-term growth potential.


Thanks to the new tax bill, your business has the opportunity to save thousands of dollars each year in taxes. As a result, you have a chance to make bold investments in your business’s tech infrastructure. The right technology will allow for greater innovation within your industry or niche. You’ll see an increase in employee productivity, customer satisfaction, and stakeholder investment. By revolutionizing the way that your employees interface with your company’s data, you can get the competitive advantage you’ve been looking for.


In the days following the new tax bill, some companies have already jumped on this opportunity. They’re aggressively investing in new tech upgrades. They’re updating their CRM and ERP, and they’re implementing various Cloud and Cybersecurity technologies, along with SharePoint. They’re utilizing new cloud solutions such as Dynamic 365 and Microsoft Office 365. All of this technology allows their employees to communicate more quickly, more thoroughly, and more efficiently. Additionally, a number of companies are working to bring various Access and Identity Management tech to bear on their business processes, including tools like Azure AD and Okta. These security measures go a long way toward reducing the likelihood of data breaches and other security issues.


Here’s the bottom line: the more data you have, the more effectively you’ll communicate with customers. As the business world continue to shift, staying up to date with shifts in technology isn’t an option: it’s a necessity.


The New Tax Bill: A Huge Opportunity for Your Company


Now’s your chance to make the new tax bill work for you. If you’re wondering how, look no further than JourneyTEAM!


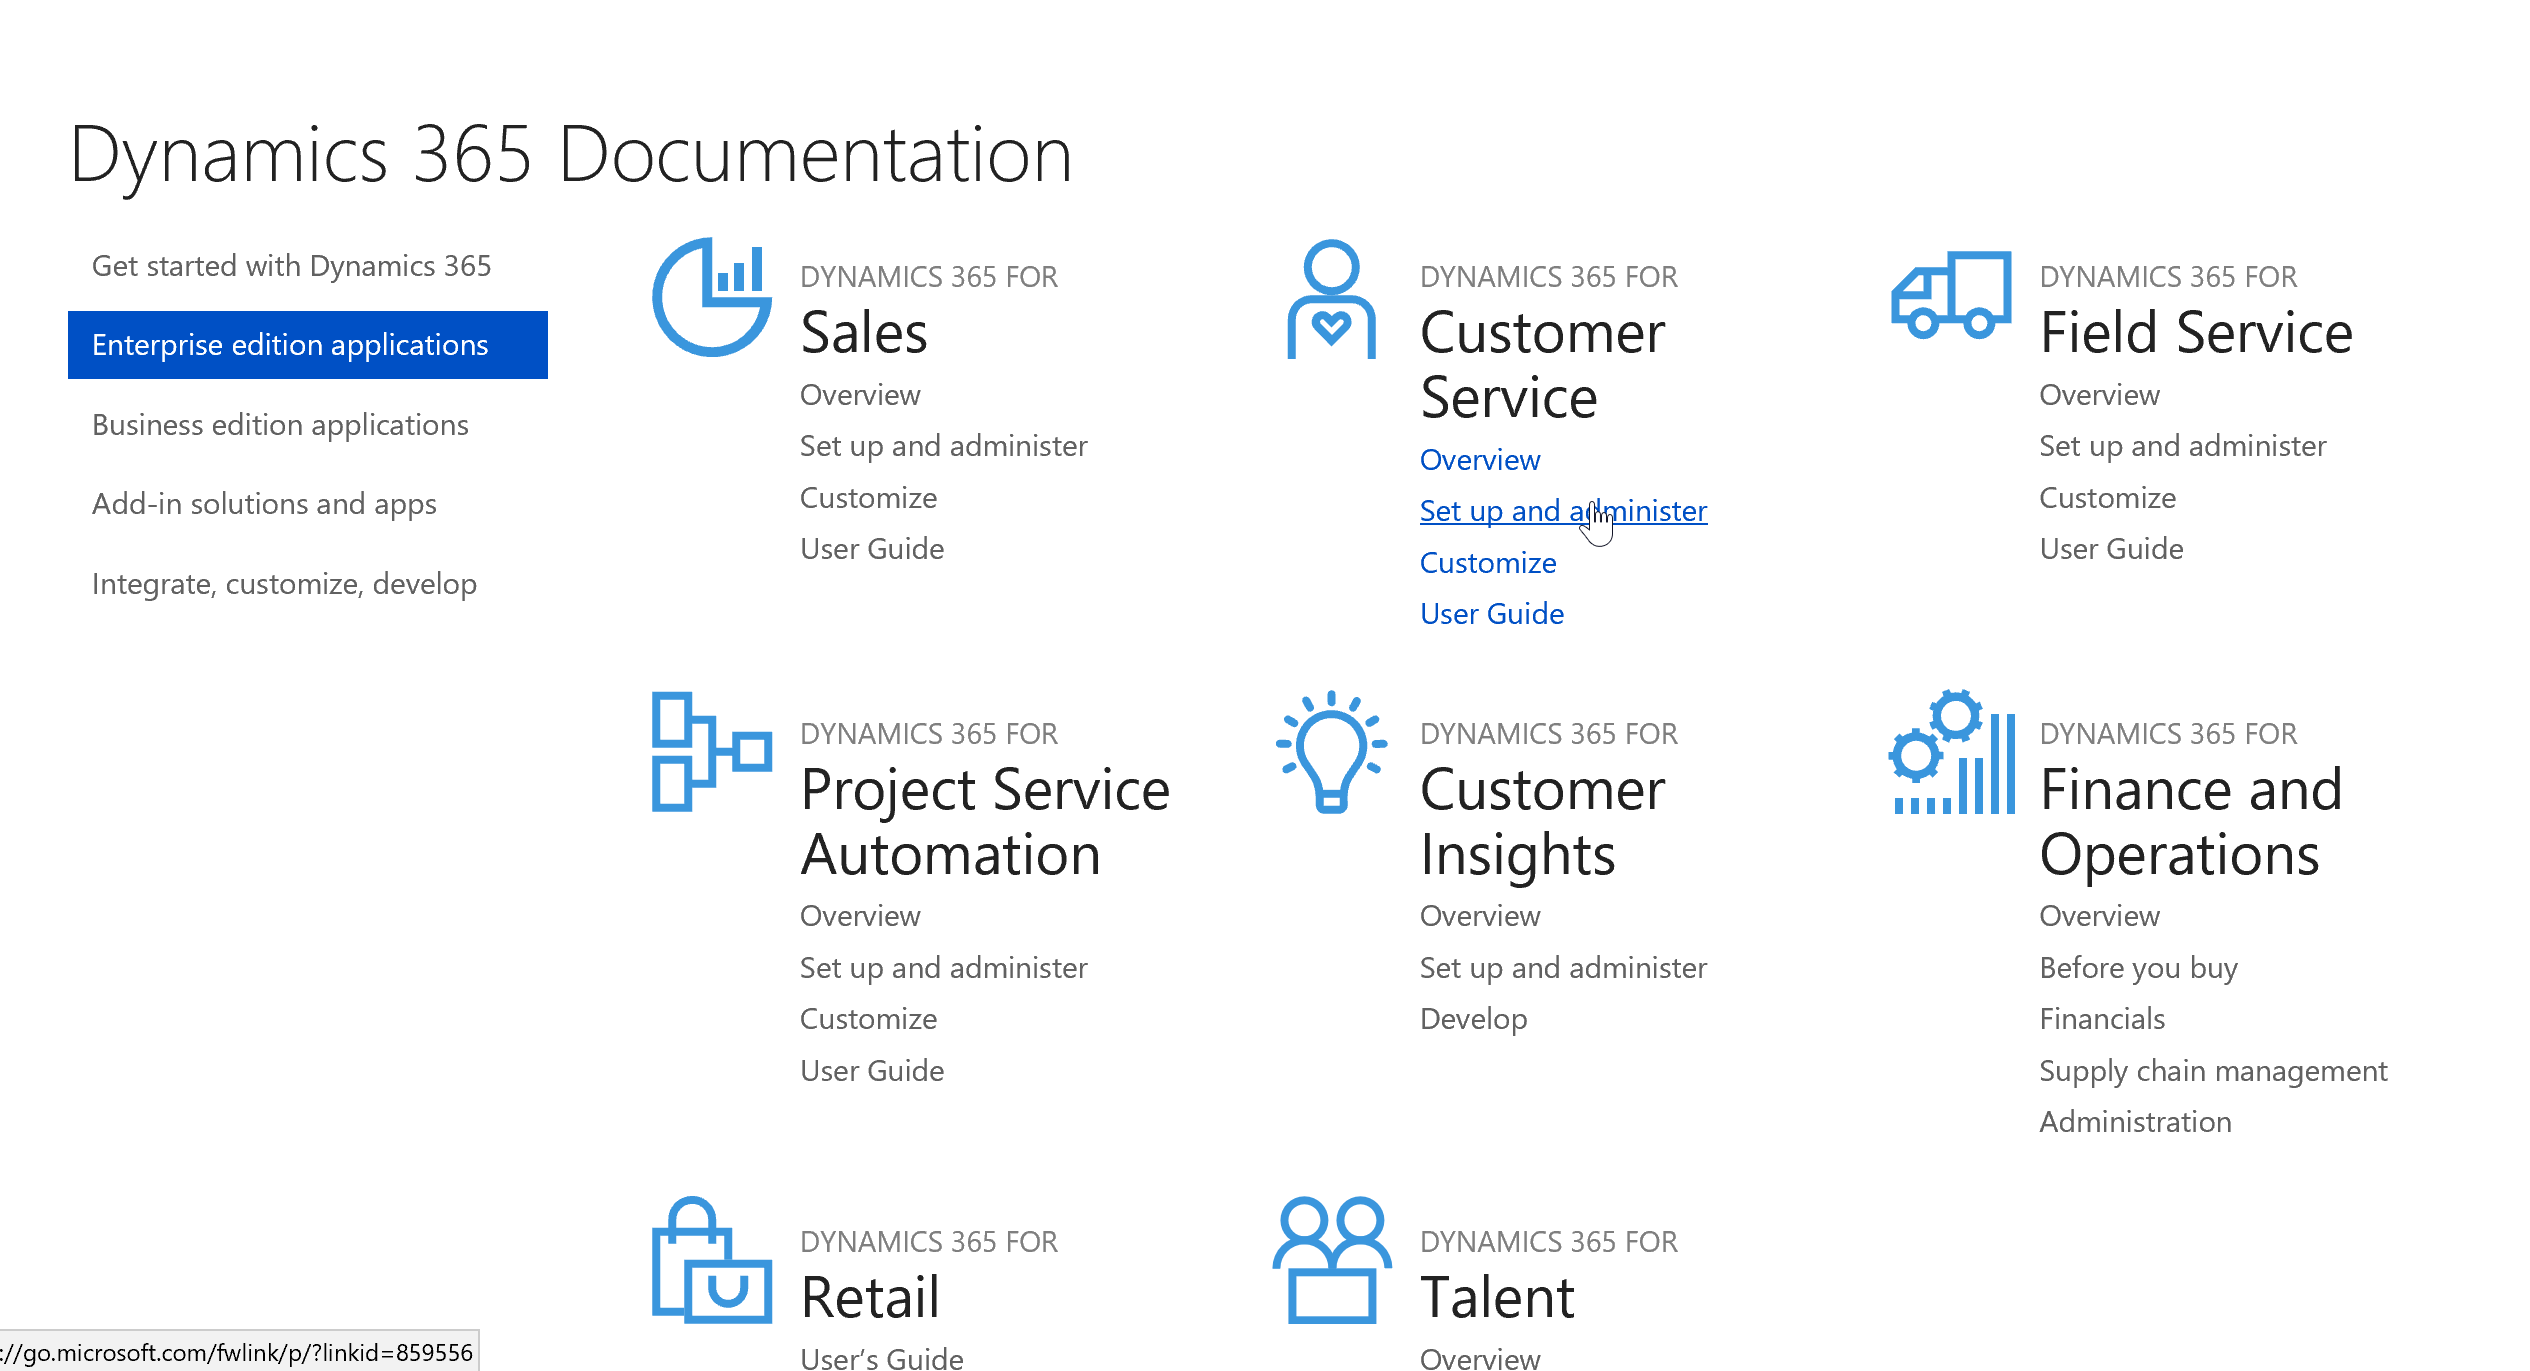
As a top 20 Okta Worldwide Partner, JourneyTEAM knows how to secure your business. And, with our Microsoft Gold Partner status, you can be sure that we bring the experience and expertise necessary to implement effective tech strategies for your business. With our help, you can put the entire Dynamics 365 stack to work for your company, including: talent, customer service, sales and marketing, CRM, ERP, field service, and finance and operations.


Send us an email at info@journeyteam.com, and we’ll forward you a complimentary copy of our white paper, entitled: “What the Heck is Digital Transformation?” If you have questions related to leveraging the new tax bill, just give us a call: (800) 439-6456.


Note: JourneyTEAM are not tax professionals. If you have tax-related questions, speak with your accountant or tax expert.


Dave Bollard

JourneyTEAM – Utah and Tennessee
ERP, CRM, Dynamics 365, SharePoint, Cloud, Microsoft Gold and Okta Top 20 Worldwide partner.

The post Leverage the New Tax Plan to Invest in Your Business appeared first on CRM Software Blog | Dynamics 365.

Basic (but important) considerations about the Dynamics 365 security model

$
0
0
The Dynamics 365 security model When it comes to data , security defines  who has the right to do  what on a record  in the respective context of the user and the data . Concerning the User Interface...(read more)

Voice of the Customer – Distribute Non-Anonymous Surveys

$
0
0

Consider this scenario. You want to send out your annual survey to your top clients using a third-party mailing software. How do you get the links distributed to the Contacts and then get them into your mailing system?

The answer is to create an On-Demand Workflow that you run against the selected Contacts to generate Survey Activity Records for the clients which will give them their own unique survey links. Then export that list to Excel and use it with your external email system.

Note: Click on any image to open it up in full screen view which you may find to present a clearer image.

Let me walk you through the process.

  1. Create the On-Demand Workflow that will run against the Contact record.

VOC Workflow

2. Now Set the Properties – Note that the workflow will be unique to a specific Survey so that is hard coded into the Properties. The other minimum required fields are pulled from the information in the Contact record that the workflow is being run against.

VOC Workflow

3. Now run the workflow against a grid view of the Contacts that you want to send the Survey.

Workflow against Contacts

4. After running the Workflow, go to the Advanced Find View and create a view for Survey Activities for your specific Survey. Add the To, Survey, Email (Contact) and  Invitation Link fields to the Columns. Run the query and you will get the results that you can export to Excel and use in your third party mailing system. Each recipient will get their own unique link to the survey.

VOC Unique Non-Anonymous Survey Links

The post Voice of the Customer – Distribute Non-Anonymous Surveys appeared first on CRM Innovation - Microsoft Dynamics 365 Consulting and Marketing Solutions.

How to Plan, Select, and Motivate Your ERP Project Team

$
0
0

It’s been decided. Your organization has selected an ERP system to automate your business processes into one wholly integrated database. Either due to organic growth, outdated technology, or ever-changing business requirements, your organization will be implementing a best of breed solution with great expectations.

Along with those expectations is a growing perplexity of whom from the organization should be entrusted with such a grand responsibility. This responsibility can make or break a project. The decision to place your resources on the Project Team should not be taken lightly. The creation of a team of well-tuned, motivated, out of the box thinkers can be difficult to assemble. There are many factors that go into selecting the correct Project Team, and in this blog, we’ll discuss some helpful hints on how to plan, select, and motivate your new ERP Project Team to set up your organization for success!

Planning for the Team

The fundamental factors in creating an ERP Project Team are time commitment, financial capabilities, and the scope of the project. These three factors will determine how the team will be compiled. Also playing a major role, is the size of the organization and the availability of resources. Below are areas to think about when planning your team.

  • What is the scope of the project?Is the first implementation slated for only one site or are there multiple sites in your plan? If there are multiple sites in your plan, are they local or are they remote? If there are multiple sites and/or remote sites, it is imperative that you include them on the team as fully functioning team member. Even if the second site is not as large as a corporate headquarters, there still needs to be full representation from every site that will be going live in the first phase of the project. Sometimes a smaller site can become the “forgotten stepchild” of the project, and resources are only brought in at the beginning of testing. This can result in feelings of mistrust by the remote team and the sense of not having a say in project/business decisions.
  • Will the project team members be 100% dedicated to the project?This question depends primarily on two aspects of the organization. First, what is the financial capability of the organization? Can the organization backfill the positions of a project team member’s daily business role? Second, what is the availability of the resources? Can the organization maintain the business without them while they are solely working on the ERP project? If the team will not be 100% dedicated, discuss and agree on expectations with management. Know that the team will not only be responsible for their regular day job, but will also be tasked with a large project that will consume up to 100% of their time as well. For some team members, this can be too much and the workload can become unbearable. Another factor to consider is the fact that team members who are not 100% dedicated, will feel a natural responsibility to their job, and will gravitate back to their daily routine and not necessarily the project.
  • Will your organization have a Project Manager on staff?During these large projects, it is imperative that you assign a Project Manager. This is someone that the team will look to for direction and guidance. Is there already a well-seasoned ERP Project Manager on staff? If not, it is highly suggested to recruit this position. Projects can fall behind of there is a lack of leadership coming from the Project Team. It’s critical that a Project Manager be assigned to keep the team on track, facilitate communications, and verify that action items, issues, and decisions are completed on time, and by the right people.
  • From a technical perspective, what does your project require?Business Analysts? Database Administrators? Developers? Report Writers? It is crucial that these roles are decided upon and either outsourced or retained in-house.
    Be sure to assign specific data sets to specific team members: Item Master, Customer Master, Vendor Master, etc.

Selecting the Project Team

Now that you have gone through the planning process, it is now time to select the team members tasked with transforming your business processes and a solution that takes your organization to new heights. The following points outline the qualities each team member should possess to ensure strong team cohesion.

  • For every functional area that will be impacted by the project, a Subject Matter Expert (SME) should be selected. This resource will have a deep understanding of their departmental business processes and requirements. This is critical for the business process design work that is to come. They will have complete responsibility for the delivered project within their functional area as well as ultimate decision making for their area of responsibility. This expectation must be set at the very beginning of the project.
  • Look for an “out of the box” thinker that will be able to redesign business processes and is thoroughly versed in the requirements of the organization.
  • Select Change Leaders that aren’t afraid to step out of their comfort zone. This will give the organization a better chance of designing the best solution.
  • Be wary of those that are resistant to change or have tendency to not be fully engaged in offering solutions or ideas that will benefit the company.
  • Stay focused on those who can see the project through. There will be deadlines to meet and this will require more than an eight-hour day, especially if they are not 100% dedicated to the project. It is rare for a project to not require after hours or weekend work. Each team member should have a strong work ethic.
  • Emotional fortitude will be a strong quality to possess. These large projects can be very stressful on the project team and the ability to handle conflict is necessary. There will be competing agendas and naturally, there will be disagreements on how best to move forward through all the obstacles these projects present.
  • Look for resources that are team players – people that can bounce ideas off others and make decisions quickly.
  • Finally, only select those that have complete respect for all of their colleagues. This will be crucial in teamwork facilitation and will reduce conflict. This team will be together for a long time and mutual respect will be required throughout the entire project.

Motivating your Team

So your project team is selected and the members are assigned to their specific roles, now what? If you are like many organizations, not everyone on the team will know each other. To foster a team-winning environment, creating the motivation to tackle all the project hurdles is a must. Since stress, anxiety, and intense workloads are common for these kind of projects, inserting fun activities to motivate your team will help them retain their resilience. Below are some tips for keeping your new ERP Project Team motivated.

  • Prior to the start of formal project activities, a team building activity is highly recommended. Preferably, offsite as this will allow the team to get to know each other in a fun and non-intrusive activity. Team members will learn each other’s personality styles and problem solving skills. Numerous organizations offer team-building exercises that you can search for on the internet.
  • Hold a contest within the team to name the project. Have the team vote on the names and award the winner a prize.
  • Along with the name of the project, develop a logo that fits the name. Purchase t-shirts the team can wear for important milestone dates.
  • Reward the hard work of the team with team lunches, team dinners, etc.
  • A local night on the town, maybe a ball game, or an activity that will allow the team to let off some stress is always a great way of showing appreciation.
  • Reward individual team members for going above and beyond their project responsibilities or putting in additional effort.
  • Be respectful of their time; clearly communicate far in advance the dates and times that the project team will be working together.
  • Granting additional PTO or vacation days to the project team to use after Go Live is another incentive to consider.

We hope this blog has given you some ideas and pointers to consider when selecting your ERP Project Team as you embark on your organization’s ERP implementation. If you’re looking to implement an ERP solution, PowerObjects can help! Learn more here.

Happy Dynamics 365’ing!

A Dynamics 365 local message listener for web client notifications - part 3

$
0
0

Several months ago I discussed an approach for passing notifications from local applications to the Dynamics 365 web client through a message listener process that runs on an end user's PC and shared some sample code for how to implement it.

Recently I used this approach to establish communication between Dynamics 365 web resources and a fingerprint reader attached to a local PC. The actual coding was fairly simple, but I did run into a problem that I did not encounter when I built my original proof-of-concept message listener because I was accessing Dynamics 365 via HTTPS as opposed to HTTP like I had been in my on-prem development sandbox. Because mixed content can be a security risk, modern browsers typically block pages that are accessed via HTTPS from loading scripts over HTTP, which is how my listener process was running.

In order to make my listener process accessible via HTTPS, I did the following:

  1. Generated a self-signed SSL certificate to represent a root certificate authority.
  2. Generated an SSL certificate signed by my root CA to encrypt communication with my message listener process.
  3. Added the root SSL certificate from step #1 as a trusted root certificate on the local PC.
  4. Added the SSL certificate from step #2 to the personal certificate store on the local PC.
  5. Bound the SSL certificate from step #2 to the port my listener process uses.

Generating the certificates

This blog post has detailed steps I followed to generate self-signed certificates with PowerShell's New-SelfSignedCertificate cmdlet. In the past I have used OpenSSL to generate self-signed certificates, and while OpenSSL would definitely work here, I found the PowerShell approach to be much easier for my initial development purposes.

(A note on security - As I look at making this solution fully ready for production, I need to do some further investigation into the security implications of using self-signed certificates. Because I am only using them to enable communication with a process running on the local PC, I think the risks are minimal as long as the root certificate is kept secure.)

Installing the certificates

Once you have generated your two SSL certificates, you need to install them on the local PC. If you followed the directions from the blog post above to generate your certificates, you should have a public certificate for your root CA as a .cer file and a private certificate to use for the application as a .pfx file.

To install the root certificate as a trusted root certificate authority, do the following:

  1. Double-click public certificate (.cer file) for the root CA you generated. The certificate properties window will open. Click "install certificate." Install root CA - step 1
  2. The certificate import wizard will open. Select "local machine" and click next. Install root CA - step 2
  3. You may be presented with a confirmation dialog asking if you "want to allow this app to make changes to your device." If so, click yes.
  4. On the next screen, select "place all certificates in the following store" and click browse.
  5. Select "trusted root certification authorities."Install root CA - step 5
  6. Verify the certificate store input shows "trusted root certification authorities" and click next.Install root CA - step 6
  7. Click finish.Install root CA - step 7
  8. You will receive a success message. Click OK to close it.
  9. Close the certificate properties window.

To install the SSL certificate that will encrypt communication with the message listener, do the following:

  1. Double-click private certificate (.pfx) for the application certificate CA you generated. The certificate import wizard will open. Select "local machine" and click next.Install application certificate - step 1
  2. You may be presented with a confirmation dialog asking if you "want to allow this app to make changes to your device." If so, click yes.
  3. You will see the name of your .pfx file in the file name input box. Click next. Install application certificate - step 3
  4. Enter the password for the .pfx file and click next.Install application certificate - step 4
  5. On the next screen, select "place all certificates in the following store" and click browse.
  6. Select "personal."Install application certificate - step 6
  7. Verify the certificate store input shows "personal" and click next.Install application certificate - step 7
  8. Click finish.Install application certificate - step 8

Binding the application SSL certificate to the message listener port

Once you have installed the certificates on the local PC, you can bind the application SSL certificate to the port on which the message listener is listening. I am using Windows 10, but the directions outlined in this Microsoft document for Windows Vista worked for me. Presumably they will also work for Windows 7 and 8.

If you don't feel like reading the entire document, basically you can use the netsh command to encrypt all requests on a specific port for a specific application using a specific SSL certificate. Here's how to configure it:

  1. Get the thumbprint from the SSL certificate you installed in the "personal" store following the instructions here - https://docs.microsoft.com/en-us/dotnet/framework/wcf/feature-details/how-to-retrieve-the-thumbprint-of-a-certificate.
  2. Get the application id from your message listener application. If your message listener is a .Net application, you would use the "Assembly: Guid" value from your application's AssemblyInfo file.
  3. Open a command prompt as an administrator and execute the following command: netsh http add sslcert ipport=0.0.0.0:9345 certhash=CC5F7BF58FD666EEC844C1B949E9661267A8A310 appid={b31bee72-c2ac-411e-959b-adbd25bba2cf} You will need to substitute your specific values for "ipport," "certhash" and "appid."
  4. Verify your configuration works by starting your message listener and then making an HTTPS request.

Assuming everything works, you should now be able to access your local message listener process from your Dynamics 365 web resources. If you want to use the message listener on other PCs, you don't have to regenerate new certificates. You can just install the same certificates and run the same netsh command on every PC where the listener application will run.

What do think about this approach? Are there any real-world scenarios where it would be useful for you?


How to Show the Field Label along with the value in List view in Resco Project

$
0
0
Introduction: Recently, we had a business requirement where we need to show the Field Label in List view in the mobile app. Generally, when we create the List view in the Resco Woodford mobile project...(read more)

Plugins recursion – how can you handle it?

$
0
0
What if you register a plugin step on update of some attribute, and, then, update the same attribute in the plugin again? Dynamics can’t decide, for you, when is the right time to stop this endless...(read more)

Custom Case Origin Icons in Dynamics 365

$
0
0

When viewing a list of cases, each case displays an icon in the left-hand column. Dynamics 365 already has icons in place for Phone, Email, Web, Facebook, and Twitter. The default list provided can be added to, but a default icon is added to each ( 
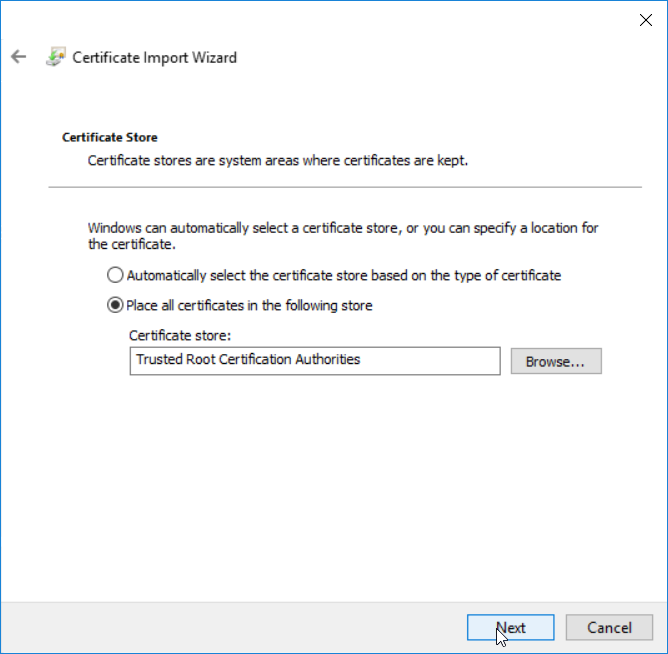
). In this blog, we’ll show you how you can customize the icon to your preference.

1. Create your Icon
This must be a 16×16 pixel image ideally a .png file with transparent background.

Tip: Find a suitable image or icon via Google Images (or similar search engine), then convert to /png, remove the background and reduce to 16×16 using an image editor such as icofx3 or similar ensuring the reduced size icon is suitable.

2. Enter the new option into the Case Origin option set (incident_caseorigincode)

It is essential to note the Value of your new option. In this example, WhatsApp has a value of 100000003.

3. Upload the image as a Web Resource into Dynamics 365.

Name: the name of the Web Resource must adhere to specific rules in order for it to be recognized and applied to the new Case Origin option:

  • It must have a prefix of new_, which means it cannot be entered into the solution with any other publisher with another prefix. To do this, upload the image into the default solution, and then subsequently add it into your custom solution if required.
  • The name must follow a specific naming convention consisting of 3 parts:
    • Part 1 must be the characters “Incident_origincode_icon”
    • Part 2 is the Value of the new option, in the example, 100000003
    • Part 3 is the file extension of the image, in the example, ‘.png’

Display Name: the display name can be anything.

Tip: use the Display Name when uploading to list all related icons together. Keep the name consistent, for example, begin all icons for the origin options as ‘Case Origin’.

Description: the description can be anything. Make it representative of the icon for future reference.

Type: this must be as per the upload image file, for this example, PNG format. JPG format; GIF format; ICO format are also permitted.

Language: this is optional.

Upload File: select the image file to upload and, once uploaded, the ‘URL’ field will be completed, in which you will see the full pathname. The file name must be: new_incident_origincode_icon999999999.ext where 999999999 is the option value and .ext is the image file type.

In the example, this will be https://mysystem.crm4.dynamics.com//WebResources/new_incident_origincode_icon100000003.png

Once uploaded and published, the icon alongside the record for the new origin will be the new icon!

Now you know how to your own Custom Case Origin Icons! For more helpful tips and tricks subscribe to our blog!

Happy Dynamics 365’ing!

Developing the plugins – divide and conquer

$
0
0
One of the main problems with plugin development is that we have a very limited set of debugging techniques. We can use the Tracing Service, but it’s not, really, debugging.. It’s tracing. We can keep...(read more)

How to create Microsoft Form integration with Dynamics 365

$
0
0
Microsoft Forms is a service that allows for the creation of a basic form quickly and easily. Forms are no longer in preview just for educational organisations and are now in preview for everybody with...(read more)
Viewing all 13977 articles
Browse latest View live


Latest Images